![To make these pumpkin chocolate chip cookies, you need a few key ingredients: - 1 cup pumpkin puree (canned or fresh) - 1 cup brown sugar, packed - ½ cup granulated sugar - ½ cup unsalted butter, softened - 1 large egg - 2 teaspoons vanilla extract - 2 cups all-purpose flour - 1 teaspoon baking soda - 1 teaspoon baking powder - 1 teaspoon ground cinnamon - ½ teaspoon ground ginger - ¼ teaspoon nutmeg - ½ teaspoon salt - 1 cup semi-sweet chocolate chips These ingredients work together to create moist, soft cookies that melt in your mouth. The pumpkin puree adds a lovely flavor and texture. It also keeps the cookies soft for days. You can customize your cookies with optional add-ins. Here are some great ideas: - Chocolate chip types: semi-sweet, dark, or white chocolate - Nuts: walnuts or pecans add crunch - Dried fruits: raisins or cranberries bring sweetness Feel free to mix and match these add-ins. Each option adds a different twist to the classic cookie! For the full recipe, check out the complete guide. To make pumpkin chocolate chip cookies, follow these simple steps. Each step builds on the last, leading to a delicious treat. 1. Preheat your oven and prepare baking sheets: Set your oven to 350°F (175°C). Line your baking sheets with parchment paper. This prevents the cookies from sticking. 2. Creaming the butter and sugars: In a large bowl, mix the softened butter, brown sugar, and granulated sugar. Beat them together until the mixture becomes light and fluffy. This step adds air to your cookies, making them soft. 3. Mixing wet and dry ingredients: Add the pumpkin puree, egg, and vanilla extract to the butter mixture. Stir until everything is well combined. In another bowl, whisk the flour, baking soda, baking powder, cinnamon, ginger, nutmeg, and salt. Gradually mix the dry ingredients into the wet ingredients. Do not overmix; just combine until you see no flour. This keeps the cookies tender. 1. Forming and placing cookie dough on baking sheets: Use a cookie scoop or spoon to drop rounded tablespoons of dough onto the prepared baking sheets. Make sure to leave space between each cookie. This allows them to spread while baking. 2. Baking times and tips for doneness: Bake your cookies in the preheated oven for 10-12 minutes. Look for lightly golden edges. The centers may look a little soft. They will firm up as they cool. If you want a chewier cookie, take them out a minute early. Following these steps will lead you to perfect pumpkin chocolate chip cookies. For the complete recipe, check out the Full Recipe. Enjoy your baking! To get soft and chewy cookies, you must measure your ingredients correctly. Use a kitchen scale for the best results. If you don’t have one, spoon flour into your measuring cup and level it off. Do not pack it down. Another key tip is to avoid overmixing the dough. Once you add the dry ingredients, mix just until you can’t see flour anymore. Overmixing can lead to tough cookies. Remember, a few lumps are okay! Bring your cookies to life with extra spices or extracts. A pinch of nutmeg or allspice can add depth. You might also try adding a splash of maple or almond extract for fun twists. Using quality chocolate chips makes a big difference. I recommend semi-sweet chocolate chips for a balanced taste. You could also try dark chocolate for a richer flavor. Choose brands that use real chocolate for the best melt and taste. For the complete guide, check the Full Recipe. {{image_2}} You can easily make pumpkin chocolate chip cookies fit your diet. For a gluten-free version, use alternative flours like almond or coconut flour. These flours add a nutty taste and keep the cookies light. Just remember to adjust the amount since these flours absorb more moisture. If you want a vegan option, swap the egg with a flaxseed egg. Mix one tablespoon of ground flaxseed with three tablespoons of water. Let it sit for five minutes to thicken. Use coconut oil instead of butter for a dairy-free treat. To boost the flavor, add spice blends. Pumpkin pie spice and chai spices work well in these cookies. A teaspoon of pumpkin pie spice gives warmth and comfort. For chai spices, try a mix of cinnamon, cardamom, and ginger for an exotic twist. You can also have fun by swapping in different mix-ins. Coconut flakes add chewiness and a tropical flair. Peanut butter chips bring a delightful richness. Experiment with these options to create your perfect cookie. For the full recipe, check out the Pumpkin Spice Chocolate Chip Cookies. To keep your pumpkin chocolate chip cookies fresh, store them in an airtight container. This helps prevent them from drying out. Place the cookies at room temperature for up to five days. If you want to keep them longer, consider refrigeration. Just make sure to wrap them well in plastic wrap first. For longer storage, freezing is a great option. Place the cookies in a freezer-safe bag or container. They can last up to three months in the freezer. When you want to enjoy them, just thaw at room temperature or warm them in the oven. These cookies are best when fresh but will stay tasty for about five days at room temperature. If you refrigerate them, they may last a week but could dry out. Watch for signs of spoilage. If they smell off or look hard, it’s time to toss them. To keep your pumpkin chocolate chip cookies at their best, follow these storage tips. Enjoy the delicious flavors for as long as possible! For the full recipe, check out the [Full Recipe]. Can I use fresh pumpkin instead of canned? Yes, you can use fresh pumpkin. Just cook and puree it first. Fresh pumpkin adds a nice flavor. However, ensure it is well-drained to avoid excess moisture in the dough. How do I know when the cookies are done baking? Look for lightly golden edges. The centers might seem soft but will firm up while cooling. A good test is to gently touch the edge. If it feels set, they are done. Can I make the dough ahead of time? Absolutely! You can make the dough and chill it for up to 24 hours. Just wrap it tightly in plastic wrap. This way, the flavors deepen, and it’s ready when you are. What’s the best way to reheat leftover cookies? To reheat, use a microwave for about 10-15 seconds. This warms them up and keeps them soft. You can also use an oven at 350°F for 5 minutes for a crispier texture. Suggested pairings for serving (drinks and sides) These cookies go well with warm apple cider or a glass of milk. For a cozy touch, serve them with spiced tea. A scoop of vanilla ice cream on the side makes them even more special. Nutritional information for the cookies Each cookie has about 150 calories. They contain 7g of fat, 21g of carbs, and 2g of protein. They are a tasty treat, so enjoy them in moderation! Check the full recipe for more details on portions. This blog post covered how to create delicious pumpkin cookies. We looked at key ingredients like pumpkin puree, sugars, and baking essentials. I shared tips for achieving the perfect texture and flavor, along with variations for different diets. You can store your cookies to keep them fresh and tasty. Remember, cooking is about experimenting and enjoying the process. Have fun with your baking journey, and don’t hesitate to try out new ideas!](https://mealmaple.com/wp-content/uploads/2025/05/b3e872b8-bb07-4eb8-8ca4-50d67197275e.webp)
Pumpkin Chocolate Chip Cookies Irresistible Treats
If you love the warm, cozy flavors of fall, you’re in for a treat! Pumpkin chocolate chip cookies blend sweet
If you love the warm, cozy flavors of fall, you’re in for a treat! Pumpkin chocolate chip cookies blend sweet
![To make a Mediterranean chickpea salad, gather these ingredients: - 1 can (15 oz) chickpeas, drained and rinsed - 1 cucumber, diced - 1 pint cherry tomatoes, halved - 1/2 red onion, finely chopped - 1 bell pepper (any color), diced - 1/2 cup kalamata olives, pitted and halved - 1/4 cup fresh parsley, chopped - 1/4 cup feta cheese, crumbled (optional) - 3 tablespoons olive oil - 2 tablespoons fresh lemon juice - 1 teaspoon dried oregano - Salt and pepper to taste You can use fresh or canned chickpeas for your salad. Canned chickpeas save time and are easy to use. They are already cooked and ready to go. Just drain and rinse them before adding to your salad. If you prefer fresh chickpeas, you will need to cook them first. This can take longer but adds a nice texture. Both options work well, so choose what fits your time and taste. Feel free to customize your salad with optional add-ins. Here are some ideas to make it your own: - Avocado for creaminess - Roasted red peppers for a smoky flavor - Artichoke hearts for a tangy twist - Sun-dried tomatoes for extra richness - Fresh mint or basil for a burst of freshness These add-ins can enhance the salad and cater to your taste. Mix and match to find your favorite combination! For the full recipe, check out the instructions and serving tips. Start by gathering all your veggies. You will need a cucumber, cherry tomatoes, red onion, and bell pepper. Dice the cucumber and bell pepper into small pieces. Cut the cherry tomatoes in half. Finely chop the red onion. This mix gives crunch and color to your salad. In a large bowl, add the chickpeas, diced cucumber, halved cherry tomatoes, chopped red onion, and diced bell pepper. Then, toss in the kalamata olives and fresh parsley. If you like, sprinkle crumbled feta cheese on top. This blend creates a colorful and tasty base for your salad. In a small bowl, whisk together the olive oil, fresh lemon juice, dried oregano, salt, and pepper. Mix well until everything is combined. This dressing adds a bright flavor to your salad. Pour it over the salad mixture and gently toss. Make sure every ingredient gets coated. Let it sit for 15-30 minutes to blend the flavors. You can find the full recipe linked here for more details. To make your Mediterranean chickpea salad pop with flavor, follow these tips: - Use ripe cherry tomatoes for sweetness. - Fresh herbs, like parsley, add a bright taste. - Let the salad sit before serving. This lets the flavors blend well. - A splash of red wine vinegar can add tang. - Experiment with spices; a pinch of cumin can be delightful. Choosing the best ingredients makes your salad shine. Here’s what to look for: - Select firm cucumbers with smooth skin. They should feel heavy for their size. - Pick cherry tomatoes that are plump and smell sweet. - Look for bell peppers that are shiny and tight-skinned. - Choose kalamata olives that feel firm and have a rich color. - Fresh parsley should be vibrant green and not wilting. Present your salad in a way that makes it inviting: - Use a big, colorful bowl to show off the vibrant colors. - Garnish with extra parsley and lemon slices for a fresh look. - Pair it with warm pita bread or grilled meats for a full meal. - Serve with a simple yogurt dip for a creamy contrast. - For a fun twist, use mason jars for individual servings. For the complete dish, refer to the Full Recipe. {{image_2}} Adding tuna to your chickpea salad gives it a protein boost. Start by using canned tuna, either in water or olive oil. Drain the tuna and break it into chunks. Mix it into your salad right after you toss in the olives and parsley. The taste of the tuna will blend well with the other ingredients. You will enjoy a heartier meal that’s still fresh and light. This variation is perfect for lunch or a quick dinner. To keep your salad vegan, skip the feta cheese. You can also use avocado in its place for creaminess. Swap out regular olives for gluten-free olives if needed. Always check labels to be sure they’re gluten-free. You can add seeds, like sunflower or pumpkin, for crunch. These small changes keep the salad tasty while meeting dietary needs. Changing your salad with the seasons makes it exciting. In summer, toss in fresh corn or zucchini. In fall, consider adding roasted sweet potatoes or butternut squash. Winter calls for hearty greens like kale or spinach. You could also try different herbs like mint or dill. These adjustments not only bring new flavors but also keep the dish fresh and interesting. For the full recipe, visit the [Full Recipe] section. To keep your Mediterranean chickpea salad fresh, place it in a container. Make sure the lid seals tightly to keep air out. Store the salad in the fridge right away. This helps keep flavors bright and crisp. I recommend using glass or BPA-free plastic containers. They keep your salad safe and fresh. Look for containers with tight-fitting lids. This prevents spills and keeps your salad tasty. Avoid using metal containers, as they can react with the salad. You can eat this salad cold, so no need to reheat. If you want a warm dish, lightly sauté the salad in a pan. Add a splash of olive oil for flavor. You can also add more veggies or proteins to make it new. Try adding grilled chicken or shrimp. This makes a great twist on the original recipe. For more ideas, check the Full Recipe. A Mediterranean Chickpea Salad is a fresh and healthy dish. It mainly includes chickpeas, veggies, and herbs. You can mix in olives and feta cheese for extra flavor. This salad is colorful and packed with nutrients. The lemon juice and olive oil dressing ties all the flavors together. You can serve it as a main dish or a side. It’s perfect for lunch or dinner. Mediterranean Chickpea Salad lasts about 3 to 5 days in the fridge. Store it in an airtight container to keep it fresh. The veggies may lose some crunch over time. If you want the best taste, eat it within the first few days. Yes, you can prepare Mediterranean Chickpea Salad ahead of time. Making it a day before helps the flavors mix well. Just keep it in the fridge until you’re ready to serve. If you add feta cheese, wait until serving time to add it. This keeps the cheese fresh and tasty. For the full recipe, check out the detailed instructions above. In this blog post, we explored Mediterranean chickpea salad. We covered ingredients, preparation, and tasty variations. You learned how to choose fresh items and enhance flavors. Don't forget about storage tips for leftovers. This salad is easy and versatile. You can adjust flavors and ingredients to fit your taste. Enjoy the health benefits and freshness in each bite. Take these ideas to create your own delicious version!](https://mealmaple.com/wp-content/uploads/2025/05/69390226-8b8f-4207-97ac-832f40855477.webp)
Looking for a quick, fresh meal? This Mediterranean Chickpea Salad is your answer! Packed with vibrant colors and bold flavors,
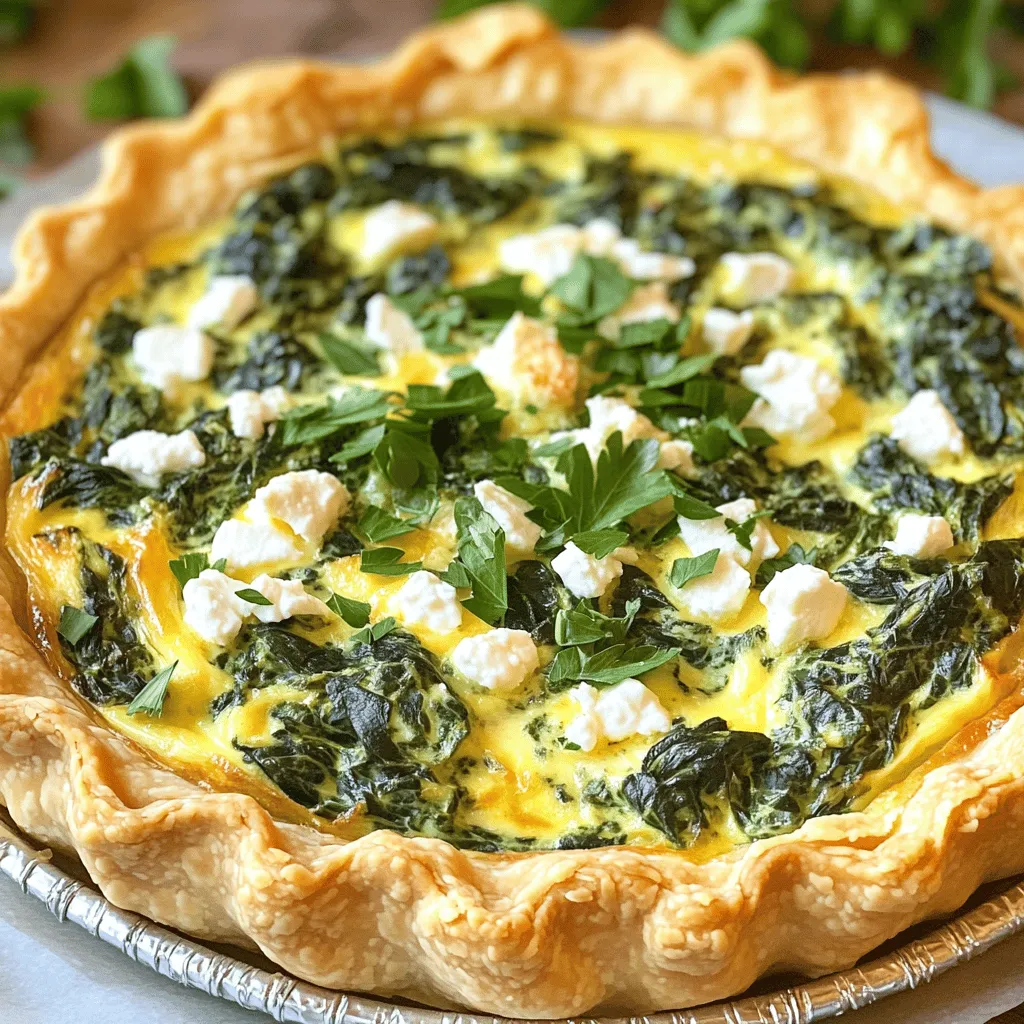
Are you ready to impress your friends and family with a delicious quiche? In this Savory Quiche with Spinach and
![For a tasty and hearty Spicy Black Bean Soup, gather these key items: - 2 cans (15 oz each) black beans, drained and rinsed - 1 medium onion, finely chopped - 3 cloves garlic, minced - 1 bell pepper (red or green), diced - 1 jalapeño, diced (seeds removed for less heat) - 4 cups vegetable broth - 1 teaspoon ground cumin - 1 teaspoon smoked paprika - 1 teaspoon chili powder - 1 tablespoon olive oil - Salt and pepper to taste - 1 lime, juiced These ingredients combine for a rich, flavorful soup. Canned black beans save time, while fresh vegetables add crunch and taste. Don’t skip the spices; they give the soup its signature kick. To elevate your soup, consider these garnishes: - Fresh cilantro - Avocado slices - Lime wedges Garnishes add color and enhance the flavor. Fresh cilantro brightens the dish, while avocado adds creaminess. A squeeze of lime juice just before serving gives a zesty finish. For the full list of instructions and cooking methods, check out the [Full Recipe]. - Sautéing the vegetables Start by heating the olive oil in a large pot over medium heat. Add the chopped onion and bell pepper. Stir them for about 5 minutes. You want them soft and fragrant. - Adding garlic and jalapeño Next, add the minced garlic and diced jalapeño. Cook for 2 more minutes. This step adds a nice kick to your soup. - Combining ingredients and simmering Now, add the rinsed black beans, vegetable broth, cumin, smoked paprika, and chili powder to the pot. Bring the mix to a boil. Once boiling, lower the heat and let it simmer for 20 minutes. This helps the flavors meld together. - Blending for desired texture After simmering, blend the soup until creamy. You can use an immersion blender right in the pot. If you don’t have one, blend it in batches using a standard blender. Leave some chunks for texture. - Adding lime juice and seasoning Stir in the lime juice. Season with salt and pepper to your taste. If your soup seems too thick, add a bit more broth or water to reach your preferred thickness. - Presentation tips for serving Serve the soup hot in deep bowls. Garnish with chopped cilantro and avocado slices. Add a lime wedge on the side for extra zest. A drizzle of olive oil on top adds richness and looks great. For the full recipe, check the [Full Recipe]. To make your spicy black bean soup pop, focus on spices. You can adjust the heat by adding more jalapeños or chili powder. If you want a milder soup, remove the jalapeño seeds or use less chili powder. Using aromatics is key. Start with onion and garlic for a rich base. You can also add spices like cumin and smoked paprika early in the cooking. This helps the flavors bloom and blend well. Experiment with herbs like oregano or thyme for more depth. Getting the right texture can change your soup game. For a creamy soup, blend it well. I suggest using an immersion blender. This keeps some beans whole for a nice bite. If you like a chunkier soup, blend just half the mixture. You can also play with the thickness. If your soup is too thick, add more broth or water until you get your desired consistency. Remember, a little extra liquid can make a big difference! {{image_2}} You can swap beans in this recipe. Try pinto or kidney beans for a twist. Each type brings a unique taste and texture. If you want more protein, add chicken or tofu. Chicken makes it heartier. Tofu is a great choice for a plant-based meal. Both options complement the spicy black bean soup well. If you love heat, add extra jalapeños. This will give your soup a nice kick. You can also mix in fresh herbs like cilantro or oregano. These herbs brighten the flavors and add freshness. Don’t be afraid to experiment with spices, too. A dash of cayenne or smoked paprika can enhance the taste. Enjoy finding your own perfect blend in this spicy black bean soup. For the full recipe, see above. To store leftovers properly, let the soup cool down first. Then, pour it into an airtight container. Seal it well to keep out air. You can keep the soup in the fridge for up to five days. This helps preserve the taste and texture. For best results, freeze the soup in a freezer-safe container. Leave some space at the top, as the soup will expand. You can freeze it for up to three months. When you are ready to eat it, thaw the soup overnight in the fridge. To reheat, warm it on the stove over low heat. Add a splash of broth if it seems too thick. Enjoy your meal! To boost the heat, add more jalapeños. You can also use hot chili powder. Try adding a few dashes of hot sauce for extra spice. If you like, mix in crushed red pepper flakes. Always taste as you go, so you find the right heat. Yes, you can use dried beans! Start by soaking them overnight. After soaking, cook them until soft. This usually takes about one to two hours. Once cooked, you can follow the same steps in the Full Recipe. Just remember, dried beans need more time. This soup pairs well with many sides. Try serving it with crunchy tortilla chips. A fresh salad or cornbread also complements it nicely. For a complete meal, add some rice or quinoa on the side. Garnishing with avocado and lime enhances the flavors, too! I covered the key ingredients for Spicy Black Bean Soup, from canned beans to fresh veggies. I laid out step-by-step instructions for preparing and cooking the soup. You now have tips to enhance flavor and texture, plus ideas for variations. Lastly, I shared storage info to keep your soup fresh. Enjoying this soup can be both fun and easy. With a few tweaks, you can make it your own. So, grab your ingredients, get cooking, and savor each spoonful!](https://mealmaple.com/wp-content/uploads/2025/05/9fd2866a-6240-41cc-9532-0b4d079543a9.webp)
Are you ready to warm your soul with a bowl of Spicy Black Bean Soup? This tasty and hearty recipe
![When making creamy garlic mashed potatoes, you need some simple ingredients. Each one adds great taste and texture. Here’s what you will need: - 2 pounds Yukon Gold potatoes, peeled and cubed - 4 cloves garlic, minced - ½ cup heavy cream - ¼ cup unsalted butter - ½ cup sour cream - Salt and pepper to taste - 2 tablespoons fresh chives, chopped (for garnish) - 1 teaspoon garlic powder (optional for extra flavor) These ingredients work together to create a dish that is both creamy and full of flavor. Yukon Gold potatoes are ideal. They have a buttery texture that makes your mash smooth. Garlic gives a nice kick, while the cream and sour cream add richness. The butter adds a silky finish. Using fresh chives for garnish gives your dish a pop of color and a fresh taste. If you want extra garlic flavor, add garlic powder. This recipe is easy to follow, and you can find the full recipe in the article. Enjoy cooking! Start by boiling a large pot of salted water. Use enough water to cover the potatoes. Add 2 pounds of cubed Yukon Gold potatoes. Cook the potatoes for 15 to 20 minutes. You want them fork-tender, meaning a fork goes in easily. Once done, drain the potatoes well in a colander. Return them to the pot. This keeps them warm while you prepare the garlic butter. In a small saucepan, melt ¼ cup of unsalted butter over medium heat. Once melted, add 4 minced garlic cloves. Sauté them for about 2 to 3 minutes. Watch carefully to avoid browning the garlic. You want the garlic fragrant, not burnt. This mixture adds a rich flavor to your mashed potatoes. Pour the garlic butter mixture over the drained potatoes. Next, add ½ cup of heavy cream and ½ cup of sour cream. Now it's time to mash! Use a potato masher for a smooth and creamy texture. If you like it chunkier, mash until you reach your desired consistency. Season with salt, pepper, and 1 teaspoon of garlic powder if desired. Mix everything well for a creamy finish. Taste and adjust the seasoning as needed. For a lovely touch, garnish with fresh chives. You can find the full recipe above. To get the best creamy texture, start with Yukon Gold potatoes. These potatoes have a smooth and buttery flavor. They mash well and create that perfect creamy consistency. Make sure to peel and cube them to help them cook evenly. Using warm ingredients is also important. When you add cold cream or butter to hot potatoes, it can make them gummy. Warm your butter and cream before mixing them in. This small step can make a big difference in the final dish. You can add more flavor with some simple seasonings. Try adding fresh herbs like rosemary or thyme. These herbs pair well with garlic and give a fresh taste. You might also add a pinch of nutmeg for a warm, earthy note. If you want stronger garlic flavor, consider using garlic powder. It can boost the garlic taste without adding more fresh garlic. Add it slowly until you reach your desired flavor. Taste your mashed potatoes often to find the right balance. For mashing, I recommend using a potato masher. It gives you better control over the texture. You can mash them smooth or leave some lumps if you prefer. If you want a super creamy result, you can use a stand mixer. It will whip the potatoes quickly and make them fluffy. Just be careful not to overmix, as this can make them gluey. A handheld mixer can also work, but it may not give the same creamy results. For the full recipe, check out the [Full Recipe]. {{image_2}} You can use different types of potatoes for your mashed potatoes. Yukon Gold gives a rich taste. Russet potatoes will make them fluffier. If you want a unique flavor, try sweet potatoes. They add a nice sweetness. If you need a dairy-free option, use almond milk or coconut milk. Instead of butter, you can use olive oil. This keeps the creamy texture while being plant-based. To enhance flavor, consider adding herbs and spices. Chives and parsley work well. For a kick, try adding a pinch of cayenne pepper. You can also mix in roasted garlic for a deeper taste. Incorporating cheese is a great way to add richness. Cream cheese offers a smooth texture. Parmesan adds a nice salty bite. For a bold twist, try blue cheese or cheddar. Garnish your mashed potatoes with fresh herbs. Chives, parsley, or even a sprinkle of paprika can make them pop. You can also drizzle olive oil or melted butter on top for shine. Serve your creamy garlic mashed potatoes with roasted meats or grilled vegetables. They pair well with steak, chicken, or fish. For a fun twist, put them in a bowl, and add your favorite toppings like bacon bits or caramelized onions. For the full recipe, check out the Full Recipe section. For storing your creamy garlic mashed potatoes, use airtight containers. Glass or plastic containers with tight lids work well. Make sure they are clean and dry before adding the potatoes. Place the lid on securely to keep out air. This helps prevent drying out. Store the mashed potatoes in the fridge. They stay fresh for about three to five days. When it's time to enjoy your leftovers, you have a few options. You can reheat them in the microwave or on the stove. If using the microwave, place the potatoes in a safe dish. Cover them with a damp paper towel. Heat in short bursts, stirring in between. On the stove, warm them over low heat. Stir often to avoid sticking. To regain creaminess, add a splash of heavy cream or milk while reheating. Mix well to bring back that smooth texture. If they seem dry, don’t hesitate to add more cream. You can freeze your creamy garlic mashed potatoes for later. First, let them cool completely. Use freezer-safe bags or containers. Portion them into smaller sizes for easy meals. Remove as much air as possible before sealing. To defrost, place the frozen potatoes in the fridge overnight. For quicker results, warm them in the microwave. When ready to eat, follow the reheating guidelines to restore creaminess. Enjoy your delicious potatoes anytime! Check out the Full Recipe for detailed cooking steps. Yukon Gold potatoes are the best choice for creamy mashed potatoes. They have a buttery texture that creates a rich taste. Their waxy nature helps them mash smoothly. You can also use Russet potatoes for fluffier results. They absorb more liquid, giving a lighter feel. For the best outcome, combine both types for a perfect mix of creaminess and fluffiness. Yes, you can prepare creamy garlic mashed potatoes ahead of time. Make them a day before your meal. After mashing, let them cool completely. Store them in an airtight container in the fridge. When you're ready to serve, reheat them gently. You can add a splash of cream for extra creaminess. Stir well to mix everything together. If your mashed potatoes are lumpy, don’t worry! You can fix them. First, try mashing them again with a potato masher. If that doesn't work, use a hand mixer for a smoother texture. Add a bit more cream or butter to help blend everything. If needed, pass the potatoes through a fine sieve. This will give you a silky finish. In this post, you learned how to make creamy garlic mashed potatoes. We covered ingredients, step-by-step instructions, and great tips for flavor and texture. Remember, using Yukon Gold potatoes and warm ingredients is key. Feel free to explore variations to match your taste. Whether you’re serving them for a holiday or regular meal, these mashed potatoes will impress. Store leftovers properly to enjoy later. Now, get ready to make a dish that your family will love!](https://mealmaple.com/wp-content/uploads/2025/05/5ff9bb4a-7c67-42b6-b212-c47a245e6a1d.webp)
If you’re seeking the perfect creamy garlic mashed potatoes, you’re in the right place! This easy recipe will transform your
![To make Rainbow Veggie Wraps, gather these fresh ingredients: - 4 large whole grain tortillas - 1 cup hummus (any flavor) - 1 cup shredded purple cabbage - 1 large carrot, julienned - 1 cup cucumber, thinly sliced - 1 bell pepper (any color), sliced into strips - 1 avocado, sliced - 1 cup alfalfa sprouts - Fresh cilantro or parsley for garnish - Salt and pepper to taste - Optional: squeeze of lime juice Rainbow Veggie Wraps are not only colorful but also healthy. Each wrap is filled with vitamins and fiber. The hummus adds protein and healthy fats. Here’s a breakdown per wrap: - Calories: 180 - Protein: 6g - Carbs: 30g - Fiber: 7g - Fat: 5g You can mix and match ingredients to fit your taste. Try these swaps: - Use spinach or lettuce instead of tortillas for a low-carb option. - Swap hummus for a bean spread or guacamole for a different flavor. - Use any seasonal veggies like zucchini or radishes for crunch. - Add grilled chicken or tofu for extra protein if desired. For the full recipe, check the earlier section. Enjoy making these vibrant wraps! First, wash all your veggies well. Clean vegetables are key for great taste. Peel and julienne the carrot into thin matchsticks. Slice the cucumber and bell pepper into strips. Shred the purple cabbage into fine pieces. Finally, slice the avocado carefully. Each veggie adds color and crunch to your wrap. Take a large whole grain tortilla and lay it flat. Spread about ¼ cup of hummus evenly on the tortilla. Leave a little space at the edges. Next, layer the shredded cabbage, carrot, cucumber, bell pepper, and avocado. Add a handful of alfalfa sprouts on top. Sprinkle with salt and pepper. If you like, add a squeeze of lime juice for zing. To roll your wrap, fold the sides of the tortilla in first. Start at one end and roll it tightly. Make sure it's packed but not too full. This helps to keep it together. Once rolled, slice each wrap diagonally in half. This makes for a pretty presentation. You can find the Full Recipe in this article for more details on each step. To keep your Rainbow Veggie Wraps crisp, use fresh veggies. Choose vibrant colors for a fun look. Wash and dry your vegetables before cutting. Cut them just before you assemble the wraps. This helps keep them from getting soggy. Store your wraps in a cool place until you are ready to eat. If you plan to eat them later, wrap them tightly in plastic wrap. Serve your Rainbow Veggie Wraps on a bright plate. Cut them diagonally to show off the colors inside. Pair them with a small bowl of hummus for a tasty dip. You can also add a side of fresh fruit for a sweet touch. This makes your meal colorful and fun. If you have kids, they will love the bright colors and flavors. These wraps go well with many drinks. Try a refreshing lemonade or iced tea. You can also serve them with a light salad. A simple green salad with lemon vinaigrette works great. For a heartier option, serve with a small bowl of soup. Tomato or vegetable soup complements the wraps well. Enjoy exploring different flavors and combinations! {{image_2}} You can make these wraps vegan by using hummus as your base. Choose a gluten-free tortilla to keep it gluten-free. Many brands offer tasty gluten-free options made with brown rice or corn. Check labels to ensure they meet your dietary needs. If you want more protein, add chickpeas or black beans. These beans mix well with the veggies. You can also try slices of grilled tofu or tempeh for a hearty bite. Nuts and seeds, like sunflower seeds or sliced almonds, also work great for crunch. Feel free to switch up the hummus. Try a spicy red pepper spread for heat. A creamy avocado spread adds smoothness. You might enjoy a light vinaigrette or tahini sauce too. Each sauce brings a new flavor, so mix and match to find your favorite. Check the [Full Recipe] for more ideas and tips. To keep your rainbow veggie wraps fresh, wrap them tightly in plastic wrap or foil. Place them in an airtight container. Store them in the fridge. They will stay good for about 2 to 3 days. Make sure to keep any extra hummus in a separate container to avoid sogginess. These wraps taste best fresh. However, if you want to heat them up, unwrap them. Place the wraps on a skillet over low heat. Heat each side for about 2 minutes. This warms the wraps without making them too soft. You can also use a microwave. Heat on low for about 15 to 20 seconds, but be careful. Microwaving can make the wraps chewy. You can freeze these wraps for later use. Wrap each one in plastic wrap, then place them in a freezer bag. Make sure to remove as much air as possible. They can last in the freezer for up to 2 months. When you are ready to eat, thaw them in the fridge overnight. Enjoy a fresh taste by adding new veggies or hummus before serving. For the complete recipe, check out the Full Recipe section. Rainbow veggie wraps are colorful, fresh, and healthy meals. They use whole grain tortillas filled with veggies. You can add hummus for creaminess and flavor. The bright colors come from different vegetables like carrots, cucumbers, and bell peppers. These wraps are fun and easy to make. They are great for lunch or a light dinner. Plus, they look beautiful on a plate! Veggie wraps can last about 3 to 4 days in the fridge. Store them in an airtight container to keep them fresh. If you use very wet ingredients, like tomatoes, they might get soggy faster. To keep your wraps crispy, eat them sooner rather than later. Yes, you can make these wraps ahead of time! They are perfect for meal prep. Just follow the steps in the full recipe. Prepare and wrap them, then store them in the fridge. Just remember to keep the wraps sealed well. This will help them stay fresh. You can use many types of vegetables in wraps! Some great options include: - Spinach - Kale - Zucchini - Radishes - Bell peppers (any color) - Broccoli - Cherry tomatoes Feel free to get creative! Use your favorite veggies to make your wraps unique. In this article, we covered how to make delicious Rainbow Veggie Wraps, including ingredients, tips, and storage advice. You learned about ingredient substitutes and how to keep your wraps fresh. We also explored various options to cater to different diets. These wraps are versatile and easy to prepare. You can mix and match ingredients based on your tastes and needs. Enjoy experimenting with flavors and textures to create your perfect wrap. Now, grab your veggies and start rolling!](https://mealmaple.com/wp-content/uploads/2025/05/5f09f4b1-1a50-454b-9dce-9b535aa6762d.webp)
Looking for a colorful and healthy snack? Rainbow Veggie Wraps are your answer! These wraps are packed with fresh veggies
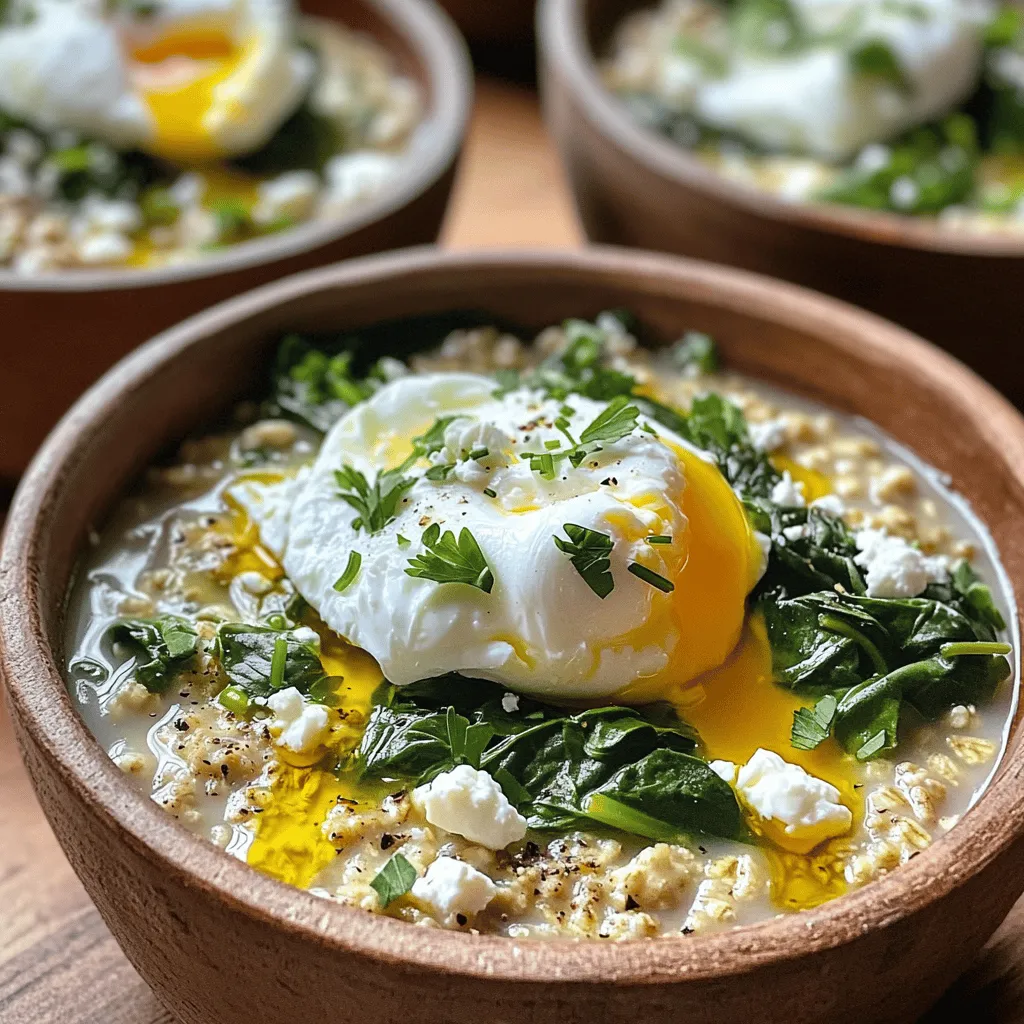
Looking for a warm, filling dish that’s packed with nutrients? My savory oatmeal with spinach and egg is just what
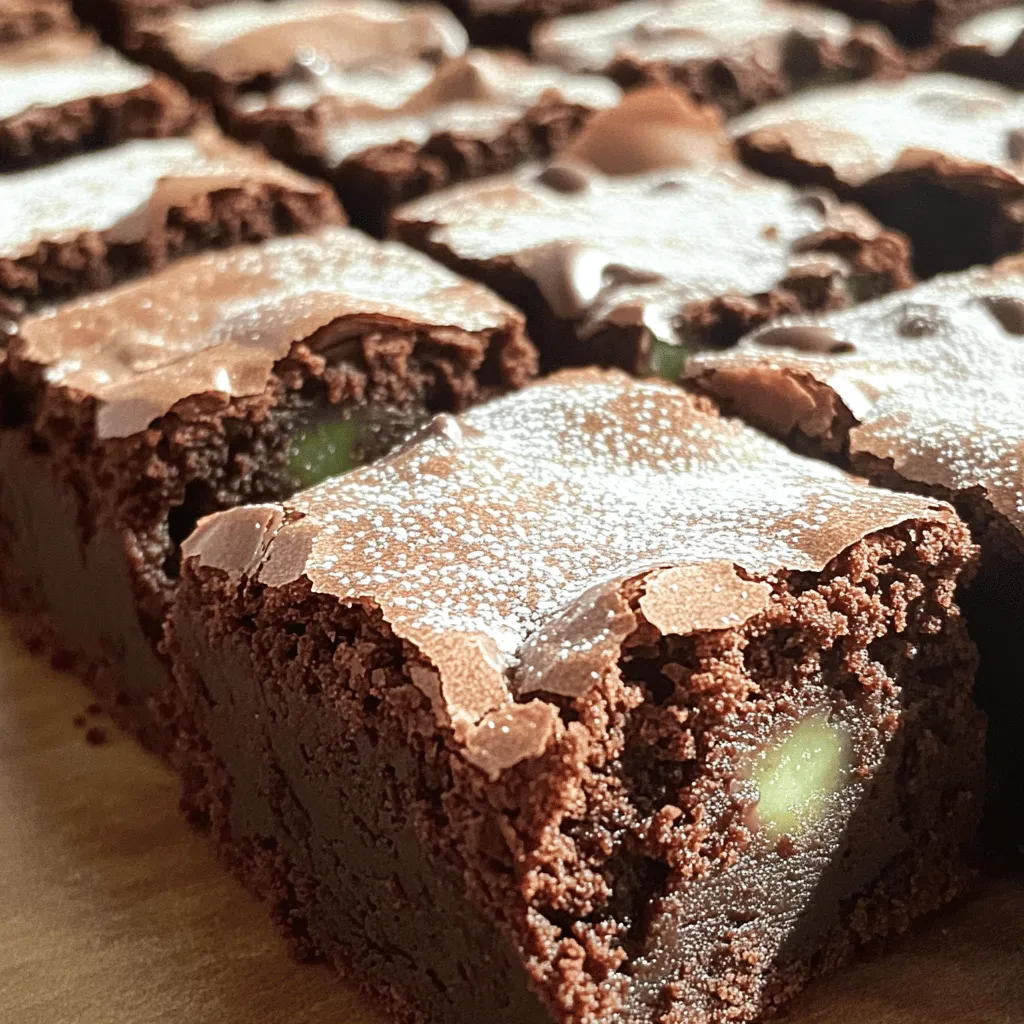
If you love chocolate and mint, you’re in for a treat! This easy recipe for Chocolate Mint Brownies will delight
![For the best slow cooker chicken tacos, gather these key ingredients: - 2 lbs boneless, skinless chicken thighs - 1 medium onion, diced - 2 cloves garlic, minced - 1 can (15 oz) diced tomatoes with green chilies - 1 tablespoon chili powder - Seasonings: cumin, smoked paprika, oregano, salt, and pepper These ingredients work together to create a rich and tasty dish. The chicken thighs stay juicy and absorb all the flavors from the spices and tomatoes. The onion and garlic add depth, while the chili powder brings heat. To make your tacos even more special, consider these toppings and sides: - Fresh cilantro, chopped - Lime wedges - Avocado slices - Suggested side dishes: rice, beans, or a fresh salad These toppings add freshness and flavor. Squeezing lime over the tacos brightens the taste. Avocado slices offer creaminess, making each bite a joy. You can customize your meal based on what you enjoy. For the complete details of this delicious dish, check the Full Recipe. Start by placing the chicken thighs in the slow cooker. Spread them out at the bottom. This helps them cook evenly. Next, you need to mix your sauce ingredients. In a bowl, combine the diced onion, minced garlic, diced tomatoes, and tomato sauce. Make sure you keep the tomato juices; they add great flavor. Now, sprinkle the chili powder, cumin, smoked paprika, oregano, salt, and pepper over the chicken. I like to season well for rich taste. Pour that tomato mixture over the chicken, covering it completely. This is where the magic begins! Set your slow cooker to low for 6-8 hours or high for 3-4 hours. This gives you flexibility based on your day. When you’re ready, check if the chicken is tender. You should be able to shred it easily with a fork. Shred the chicken in the slow cooker with two forks. Mix it well with the sauce. This will keep the chicken juicy. Warm the corn tortillas in a skillet over medium heat. Heat them for about 30 seconds on each side. This makes them soft and pliable. Now, serve the shredded chicken mixture on the tortillas. Don’t forget to garnish! Add chopped cilantro and squeeze lime juice over the top. If you love avocado, add slices for extra creaminess. For presentation, I recommend serving the tacos on a large platter. Place lime wedges and a bowl of chopped cilantro on the side. This way, everyone can customize their tacos to their taste. Enjoy your Savory Slow Cooker Chicken Tacos with friends and family! For the full recipe, check out the earlier section. To ensure juicy and tender chicken, always use chicken thighs. They have more fat than breasts, which keeps them moist. Season the chicken well before adding sauce. This step enhances the flavor. When shredding chicken, use two forks. Hold one fork in the shredded chicken, and pull with the other. This method works fast and easy. Shred the chicken right in the slow cooker. It mixes well with the sauce this way. You can adjust spices for your taste. If you like heat, add more chili powder or cumin. For a milder flavor, reduce the spices. Always taste the sauce before serving. Consider adding extra ingredients for a richer flavor. You might add chopped bell peppers or corn. They add sweetness and texture. Fresh lime juice can brighten the dish too. A squeeze just before serving makes the tacos pop. For the full recipe, check the details above for all the ingredients and steps. {{image_2}} You can switch up the protein in this recipe. While chicken is great, consider using beef or pork. Both add different flavors and textures. For a veggie option, try black beans or jackfruit. These alternatives make the dish fun and unique. Just adjust the cooking time based on the protein you choose. Spice things up by mixing in different seasonings. For a kick, add cayenne pepper or chipotle powder. You can also try a dash of salsa or hot sauce for extra zest. Incorporating veggies like bell peppers or corn can add color and crunch. This way, every bite is packed with flavor and nutrients. Tortillas are classic, but you can get creative. Use lettuce wraps for a low-carb option or serve the chicken over rice for a filling bowl. Pair your tacos with sides like black beans or cilantro lime rice. These options enhance your meal and make it even more satisfying. For the full recipe, check out the section above. To keep your leftover chicken tacos fresh, store them in the fridge. Place the tacos in an airtight container. They will last for about 3 to 4 days. If you want to store them longer, you can freeze the chicken mixture. Just let it cool first. Use a freezer-safe bag or container. The tacos will stay good for about 2 to 3 months in the freezer. When it's time to enjoy your leftovers, reheating is key. The best way to warm your chicken tacos is in the microwave. Place the chicken mixture on a microwave-safe plate. Cover it with a damp paper towel. Heat for about 1 to 2 minutes or until hot. For tortillas, warm them in a skillet. Heat over medium for about 30 seconds on each side. This keeps them soft and tasty. You can also use an oven. Wrap the tacos in foil and heat at 350°F for 10 to 15 minutes. Enjoy your meal with fresh toppings! Cooking slow cooker chicken tacos takes about 6 to 8 hours on low heat. If you're in a hurry, you can set it on high for 3 to 4 hours. The chicken should always be very tender when done. This long cooking time helps all the flavors meld together, making a rich and savory dish. Yes, you can use frozen chicken thighs. Just remember to add about an hour to the cooking time. Make sure to check that the chicken reaches a safe temperature of 165°F. Cooking from frozen can still give you great results, but thawing it first might allow for better flavor absorption. Some popular toppings for your tacos include: - Fresh cilantro - Diced onions - Chopped tomatoes - Creamy avocado slices - Shredded cheese - Squeeze of lime You can mix and match these toppings to suit your taste. A squeeze of lime adds a bright flavor, while avocado gives creaminess. Enjoy getting creative with your taco toppings! For the full recipe, click [Full Recipe]. Slow cooker chicken tacos are easy to make and full of flavor. We discussed the main ingredients like chicken thighs, diced tomatoes, and seasonings. I shared how to prepare and cook the chicken, plus tips for tasty toppings. You can mix up the recipe with different proteins and enjoy creative servings. Now you can enjoy delicious tacos any day. Try these tips and experiment with your favorite flavors. Your slow cooker is ready to help you create quick, satisfying meals.](https://mealmaple.com/wp-content/uploads/2025/05/8c1f454f-1322-4572-9b38-8915b34f42c4.webp)
Looking for a simple yet delicious meal? Savory Slow Cooker Chicken Tacos are your answer! This dish combines juicy chicken
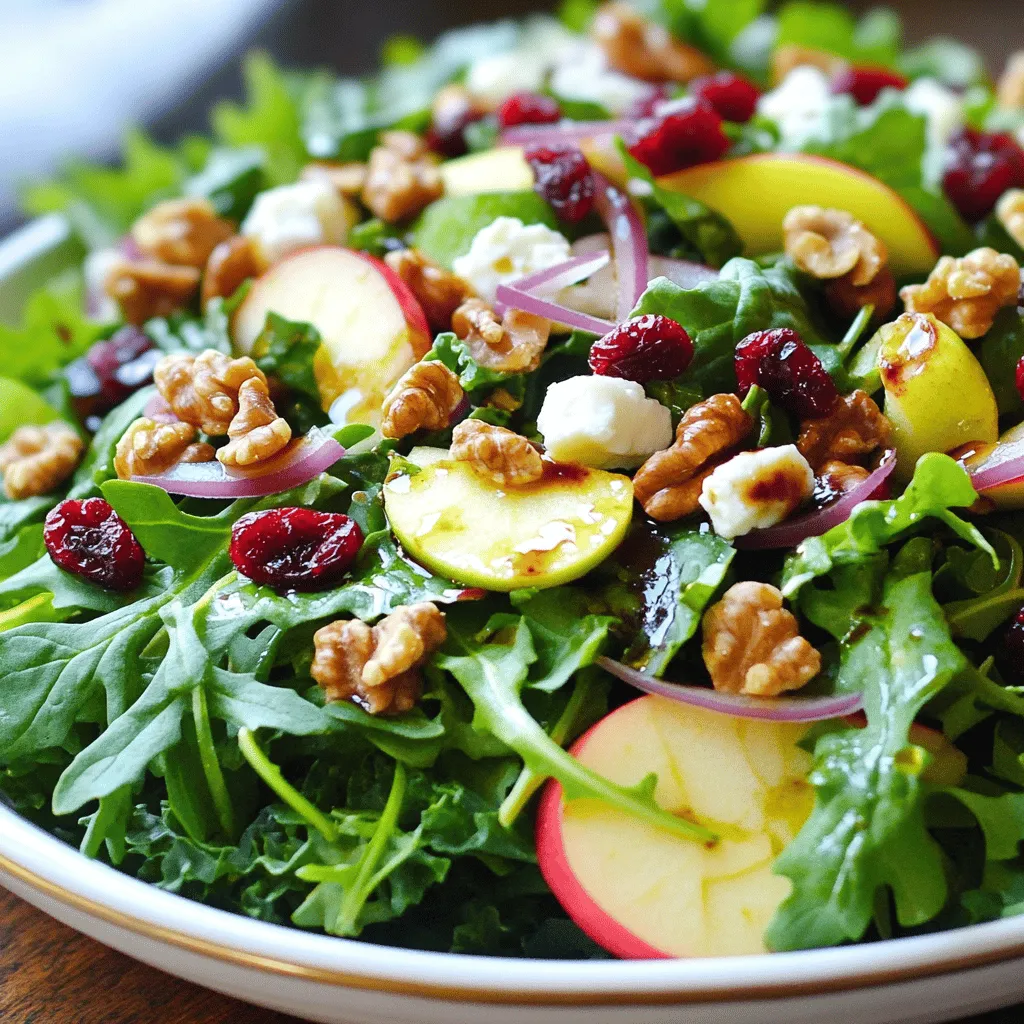
Are you ready to tantalize your taste buds with a fresh and flavorful delight? This Cranberry Walnut Salad is not