Skip to content
DisclaimerTerms Of UseGDPR PolicyCookie Policy

mealmaple

  • Home
  • Drinks
  • Appetizers
  • Dinner
  • Dessert
  • About
  • Contact
  • Privacy Policy
DisclaimerTerms Of UseGDPR PolicyCookie Policy

Evelyn

- Ripe bananas are key for flavor. They add natural sweetness and moisture. The riper, the better! Look for bananas with brown spots. They are perfect for baking and give the best taste. - Applesauce and coconut oil help keep the bread moist. Applesauce replaces some fat and adds flavor. Coconut oil gives a rich taste and is healthy. Together, they create a soft texture. - Brown sugar adds depth with a hint of caramel flavor. It makes the bread chewy. Granulated sugar adds sweetness without changing the texture. Using both gives a nice balance. - Chopped walnuts or pecans provide a nice crunch. They add a nutty flavor that pairs well with chocolate. Feel free to skip them if you prefer a smoother texture. - Extra chocolate chips on top make the bread irresistible. They melt and create a delicious topping. Add as many as you like! - Mixing bowls are essential for combining ingredients. Use a large bowl for wet and a smaller one for dry. - A loaf pan is crucial for baking. A 9x5 inch pan works best for this recipe. - Measuring tools help you get the right amounts. Use measuring cups and spoons for accuracy. This ensures your bread turns out perfectly every time. For the complete recipe, check out the [Full Recipe]. 1. Start by preheating your oven to 350°F (175°C). This sets the right heat for baking. 2. Grease a 9x5 inch loaf pan with a little coconut oil or butter. This helps the bread come out easily after baking. 3. In a large bowl, mash the two ripe bananas. They should be soft and smooth. 4. Add 1/2 cup of unsweetened applesauce, 1/3 cup of melted coconut oil, 1/2 cup of brown sugar, and 1/4 cup of granulated sugar to the bowl. Mix everything well until you have a creamy mixture. 5. Now, crack in the two large eggs and pour in 1 teaspoon of vanilla extract. Whisk until everything is mixed together nicely. 1. In another bowl, mix together 1 teaspoon of baking soda, 1/2 teaspoon of salt, and 1 1/2 cups of all-purpose flour. 2. Gradually add the dry mix to the wet mix. Stir carefully until no flour is visible. 3. Be gentle. Overmixing can make the bread tough. 1. Fold in 1/2 cup of semi-sweet chocolate chips and optional chopped nuts if you want. 2. Pour the batter into your greased loaf pan. Smooth the top with a spatula. 3. If you like, sprinkle some extra chocolate chips on top for a tasty finish. 4. Bake in the preheated oven for 50-60 minutes. Check doneness by inserting a toothpick into the center. It should come out clean. 5. Once baked, take it out and let it cool in the pan for about 10 minutes. Then, move it to a wire rack to cool completely. For the full recipe, refer to the earlier section. What is the right ripeness of bananas? For the best banana bread, use very ripe bananas. They should have brown spots and feel soft. Overripe bananas add sweetness. If you have bananas that are not very ripe, place them in a brown bag. This speeds up the ripening. What are the benefits of using applesauce? Applesauce keeps the bread moist and adds natural sweetness. It can replace oil or butter in recipes. If you don't have applesauce, use yogurt or mashed pumpkin. Both work well and keep the bread soft. What spices or extracts can I add? Adding spices like cinnamon or nutmeg can boost flavor. A drop of almond or maple extract adds a nice twist. You can mix and match flavors based on your taste. How can I adjust sugar levels? Taste is key when adjusting sugar. If you like less sweetness, cut back on sugar by a quarter. You can also use honey or maple syrup. Just remember to reduce the liquid in your recipe slightly. What are some presentation tips? Slice the banana bread while warm for the best texture. You can arrange slices on a plate and drizzle honey over them. A sprinkle of sea salt on top gives a nice contrast to the sweetness. What can I pair with banana bread? Banana bread pairs well with butter or yogurt. A little honey or maple syrup on top enhances flavor. You can also serve it with fresh fruit for a colorful plate. For the full recipe, check out [Full Recipe]. {{image_2}} You can make chocolate chip banana bread healthier by using sugar substitutes. Options like stevia or monk fruit can cut down on calories. These substitutes work well in baking and keep the sweetness. For the flour, consider whole wheat or gluten-free alternatives. Whole wheat adds fiber and nutrients. If gluten is a concern, almond flour or oat flour are great choices. These flours change the bread's texture, making it denser. Mixing in different chocolates can elevate your banana bread. Dark chocolate gives a rich taste, while white chocolate adds sweetness. Feel free to experiment with combinations for a unique twist. You can also incorporate fruits or nuts. Chopped apples or berries can add freshness. Walnuts or pecans provide crunch and flavor. These add-ins not only enhance the taste but also add texture. For fall, try pumpkin spice chocolate chip banana bread. Just add pumpkin puree and spices like cinnamon and nutmeg. This gives a warm, cozy flavor perfect for chilly days. During the holidays, consider adding festive ingredients. Dried cranberries or orange zest can brighten up the bread. These additions create a seasonal treat that everyone will love. Discover more ideas in the [Full Recipe]. After baking, let your chocolate chip banana bread cool down. Place it in a cool spot for about 10 minutes. Then, wrap it tightly in plastic wrap. You can also use aluminum foil. This keeps the bread moist and fresh for a few days. If you want to enjoy it later, store it in an airtight container. It will stay tasty at room temperature for about 3 to 4 days. If you want to keep banana bread for longer, freezing is the way to go. First, let it cool completely. Then, wrap it in plastic wrap and foil. This method helps prevent freezer burn. You can freeze it for up to three months. When you are ready to eat it, take the bread out. Let it thaw in the fridge overnight. For a quick reheat, slice it and warm each piece in the oven for a few minutes. Check your banana bread for spoilage before eating. Look for any mold or strange smells. If it feels very dry or hard, it might not taste good. If you notice any off colors or a sour smell, it's best to throw it away. Fresh banana bread should smell sweet and inviting. Always trust your senses when deciding if it's still good to eat. To boost moisture in your banana bread, adjust a few ingredients. Use very ripe bananas; they add natural moisture. You can also increase the applesauce to 3/4 cup for extra softness. Reducing the flour slightly can help too. Try to avoid overmixing the batter. Mix just until you see no dry flour. This helps keep the bread light and fluffy. Yes, you can substitute eggs! Common options include mashed bananas, applesauce, or flaxseed meal mixed with water. For one egg, use 1/4 cup of applesauce or 1 tablespoon of flaxseed meal with 2.5 tablespoons of water. These alternatives keep the bread moist and help with binding. Several factors may cause banana bread to not rise. Check your baking soda; it must be fresh. If it’s old, it won’t work well. Avoid overmixing the batter; this can make the bread dense. Make sure your oven is preheated to the right temperature. Use an oven thermometer to be sure. To boost the chocolate flavor, use high-quality chocolate chips. You can also add cocoa powder to the batter, about 1/4 cup. Try adding a splash of espresso or coffee; it deepens the chocolate taste. Lastly, sprinkle some chocolate chips on top before baking for extra richness. For the full recipe, visit the Choco-Banana Bliss Bread section. In this blog post, we explored the key ingredients and steps for making chocolate chip banana bread. Ripe bananas, applesauce, and sugar play vital roles in creating the best flavor. We covered equipment, baking tips, and variations to suit your taste. Remember, using the right ingredients can transform your bread. Try new mix-ins and storage tips to keep your bread fresh. Enjoy this tasty treat and make it your own!

Chocolate Chip Banana Bread Simple and Tasty Recipe

Are you craving a treat that’s both simple and satisfying? Look no further! In this guide, I’ll share my foolproof

- 2 cups cooked brown rice - 2 cups fresh broccoli florets - 1 cup shredded sharp cheddar cheese - ½ cup cream cheese, softened - 1 cup vegetable broth - 1 cup milk (or plant-based alternative) - 1/2 cup onion, finely chopped - 2 cloves garlic, minced - Seasoning essentials: garlic powder, onion powder, Dijon mustard, salt, black pepper When making cheesy broccoli rice casserole, I always start with the main ingredients. The cooked brown rice gives a nice base. Broccoli florets bring a fresh crunch and bright color. The sharp cheddar cheese adds a rich, tasty flavor. Cream cheese makes everything creamy and smooth. I like to use vegetable broth for depth. Milk or a plant-based option keeps it light and adds moisture. Chopped onion and minced garlic bring a wonderful aroma and taste. For seasoning, I use garlic powder, onion powder, Dijon mustard, salt, and black pepper to enhance all the flavors. - ½ cup breadcrumbs for topping - Alternative cheese options If you want a crispy top, add breadcrumbs. They give a delightful crunch. You can also swap out the cheddar for other cheeses, like mozzarella or gouda, to change the flavor. These variations make the casserole fun and unique every time! For the full recipe, check here: [Full Recipe]. 1. Preheat your oven to 350°F (175°C). This step warms the oven and helps the casserole cook evenly. 2. Grab a large skillet. Heat a splash of water or olive oil over medium heat. 3. Add the finely chopped onion and minced garlic. Sauté for 3-4 minutes. The onion should turn translucent. 4. Next, add the fresh broccoli florets to the skillet. Sauté for an additional 2-3 minutes. The broccoli should be bright green and slightly tender. Remove from heat and set aside. 1. In a large mixing bowl, combine the cooked brown rice, sautéed vegetables, and cheeses. 2. Add the vegetable broth, milk, garlic powder, onion powder, Dijon mustard, salt, and black pepper. 3. Stir until everything is well mixed. Ensure even distribution of all ingredients. This helps every bite taste great. 1. Transfer the mixture into a greased baking dish. Spread it evenly across the dish. 2. If you want a crispy topping, sprinkle breadcrumbs evenly over the top. 3. Bake in your preheated oven for 25-30 minutes. Look for a bubbly casserole with a golden brown top. 4. Once done, remove from the oven. Let it cool slightly before serving. For the full recipe, check out the specific instructions included above. To get the best broccoli texture, start by blanching the florets. Boil them for two minutes, then quickly cool them in ice water. This keeps them bright and crisp. You want your broccoli tender but not mushy. This step makes a big difference. For cheese, I recommend using sharp cheddar. It adds a rich flavor that pairs well with broccoli. You can also mix in some mozzarella for extra stretch and creaminess. Other options include Monterey Jack or Gruyère for a twist. Feel free to experiment with your favorite cheeses! Cheesy broccoli rice casserole pairs well with many dishes. Try serving it alongside grilled chicken or a fresh green salad. The creamy texture complements lighter proteins perfectly. For presentation, serve it straight from the dish for a cozy feel. If you want to impress, scoop out portions into individual bowls. Garnish with more shredded cheese and a sprinkle of black pepper. This adds color and makes it look delicious! For the full recipe, check out the link provided. {{image_2}} You can switch up the base of this dish easily. Using white rice or quinoa instead of brown rice works well. Both options give a nice texture and flavor. White rice cooks faster and is softer. Quinoa adds protein and a nutty taste. Choose what fits your meal best. For a vegetarian or vegan version, try plant-based cream cheese and milk. You can also skip the cheese or use a vegan cheese. This keeps the dish creamy and delicious without losing the flavor. For extra flavor and nutrition, think about adding more veggies. Bell peppers, carrots, and spinach can all blend nicely. Just chop them small and sauté with the onion and garlic. This adds color and crunch to your casserole. You might also want to add protein. Chicken or ham can make this dish heartier. Dice them up and mix them in before baking. This makes the casserole filling and tasty, perfect for a complete meal. For the full recipe and cooking instructions, check out the [Full Recipe]. For best taste, store leftovers in a sealed container. Let the casserole cool to room temp first. Place it in the fridge for up to three days. When reheating, use the oven or microwave. If using the oven, cover the dish with foil. This keeps moisture in and prevents drying out. Heat at 350°F (175°C) for about 20 minutes. Stir halfway through for even warmth. To freeze the casserole, let it cool completely. Use a freezer-safe container or wrap it tightly in plastic wrap. Label the container with the date. It can last up to three months in the freezer. For best results, thaw the casserole overnight in the fridge. Reheat it in the oven or microwave until hot. This keeps the flavor and texture close to fresh. Enjoy making this cheesy broccoli rice casserole anytime with these tips! For the full recipe, check the recipe section above. Can I make this casserole ahead of time? Yes, you can prepare this casserole in advance. Just mix the ingredients, cover, and store in the fridge. When you are ready to bake it, let it sit at room temperature for about 30 minutes before cooking. This helps it bake evenly. How do I make it spicier? To spice things up, you can add red pepper flakes or diced jalapeños. If you prefer heat in each bite, mix in a bit of hot sauce. Start with a small amount, then taste and adjust as needed. Is this dish gluten-free? Yes, this casserole can be gluten-free. Just be sure to use gluten-free breadcrumbs for the topping. The other ingredients, like rice and cheese, are also gluten-free. Can I use frozen broccoli? Absolutely! Frozen broccoli works well in this dish. Just thaw it and drain any excess water before mixing it into the casserole. You may want to sauté it briefly to enhance its flavor. Caloric content per serving Each serving of cheesy broccoli rice casserole contains about 300 calories. This makes it a hearty option for lunch or dinner, especially when paired with a light salad. Nutritional benefits of the main ingredients - Brown Rice: This whole grain is rich in fiber and provides energy. - Broccoli: Packed with vitamins C and K, broccoli boosts your immune system. - Cheddar Cheese: Offers protein and calcium for strong bones. - Cream Cheese: Adds creaminess and some fats for flavor. This dish combines taste and nutrition to create a delicious comfort meal that everyone can enjoy. For the complete preparation, check the Full Recipe. This casserole combines hearty rice, fresh broccoli, and creamy cheeses for a satisfying meal. You learned about the key ingredients and how to prepare them. I shared useful tips to perfect your dish and variations to keep it exciting. Storing and reheating leftovers ensures you enjoy every bite. Remember, you can adjust the recipe to fit your needs. Explore the options and make this dish your own. Happy cooking!

Cheesy Broccoli Rice Casserole Tasty Comfort Meal

Looking for a comforting meal that brings warmth and satisfaction? Cheesy broccoli rice casserole is the answer! This delightful dish

- Apples (medium size, e.g., Granny Smith or Honeycrisp) - Optional toppings (chopped nuts like pecans or walnuts) For this caramel apple dip, you want fresh apples. I love using Granny Smith for their tartness or Honeycrisp for their sweetness. Both are perfect for dipping. You can also add toppings to make it even better. Chopped nuts like pecans or walnuts add a great crunch and flavor. - Cream cheese (softened) - Brown sugar - Vanilla extract - Optional cinnamon The creamy base makes this dip special. Start with softened cream cheese for a smooth mix. Add brown sugar for sweetness and vanilla extract for flavor. If you like, sprinkle in some cinnamon. It gives a warm hint that pairs well with apples. - Store-bought vs. homemade options - Suggested brands or recipes for homemade caramel Caramel sauce is the star of this dip. You can use store-bought caramel for quick prep or make your own if you want to impress. If you choose store-bought, brands like Marie’s or Smucker's are tasty options. For homemade caramel, melt sugar slowly, then stir in cream for a rich finish. Check the Full Recipe for more details on both methods. To make the creamy base, you need to mix the cream cheese and sugars. In a medium bowl, combine 1/2 cup of softened cream cheese with 1/4 cup of brown sugar. Add in 1 teaspoon of vanilla extract. If you like, sprinkle in 1/4 teaspoon of cinnamon for extra flavor. Use a hand mixer or a spoon to mix until it is smooth. To get the right texture, ensure your cream cheese is at room temperature. If it’s cold, it won’t mix well. Mix until it’s creamy and fluffy, with no lumps. This texture makes the dip rich and enjoyable. Next, you’ll need to warm the caramel sauce. If you have a jar of store-bought caramel, that works great. In a microwave-safe bowl, heat 1 cup of caramel sauce for 15-20 seconds. This helps it drizzle easily. Be careful not to overheat it, as that can make it too thin. Stir it gently after warming to ensure it’s smooth and easy to pour. You want a nice, warm drizzle that flows over your creamy mixture. Now it’s time to assemble your dip. Spread the cream cheese mixture evenly onto a serving platter or a shallow bowl. Use a spatula for an even layer. Then, carefully pour the warm caramel sauce over the cream cheese layer. Let it drizzle down the sides for a beautiful look. For a crunchy finish, sprinkle chopped nuts on top. You can use pecans or walnuts for added flavor and texture. This dip is perfect for serving with sliced apples, making it a fun treat for all! You can find the Full Recipe for more detailed steps. For the best caramel apple dip, pick crisp apples. I love using Granny Smith or Honeycrisp. Their tartness pairs well with sweet caramel. You can also try Fuji or Gala apples for a sweeter bite. This dip shines at gatherings and parties. Serve it at fall festivals, Halloween parties, or family get-togethers. It's also great for movie nights or game days. Everyone loves a tasty snack they can dip! Make your dip stand out with fun serving platters. A wooden board adds a rustic touch. You can also use a colorful bowl to catch the eye. To make it even prettier, garnish the dip with chopped nuts. Sprinkle them on top of the caramel. You can also add a few apple slices around the platter for color. This adds a fresh look that draws people in. Avoid common mistakes to make your dip perfect. Don’t skip softening the cream cheese. If it’s too cold, it won't mix well. Make sure your caramel sauce is warm enough to drizzle easily. Adjust the sweetness to suit your taste. If you want it sweeter, add more brown sugar. For less sweetness, reduce the caramel sauce. Taste as you go, and make it your own! {{image_2}} You can make your caramel apple dip even more exciting with flavor tweaks. Adding spices can bring warmth and depth. For instance, a pinch of nutmeg or a sprinkle of pumpkin spice can elevate the taste. These spices pair well with the sweetness of caramel and apples. You can also infuse the caramel with extracts. Try using almond or maple for unique twists. This small change can make a big difference in flavor. If you want a vegan version, you can use coconut cream instead of cream cheese. This will keep the dip creamy and delicious. It also adds a subtle coconut flavor. For those needing gluten-free options, check your caramel sauce and toppings. Many brands offer gluten-free products. Always read labels to make sure they meet your needs. Incorporating seasonal fruits can make your dip even more fun. Use pears or strawberries for a fresh twist. These fruits add different flavors and textures. You can also create themed presentations for holidays. For Halloween, add spooky decorations. For Thanksgiving, use fall colors and shapes. These small touches can make your dip stand out at any gathering. Remember to check the Full Recipe for all the details! To store leftover caramel apple dip, place it in an airtight container. This keeps air out and helps it stay fresh. Before sealing, ensure the dip is cool. This prevents condensation that can affect the texture. Store it in the fridge for up to five days. Always use a clean spoon when serving to avoid contamination. This helps maintain freshness and flavor. You can safely eat the dip within five days. After this, it may spoil. Look for signs of spoilage, like an off smell or changes in texture. If the dip becomes watery or the cream cheese separates, it’s best to discard it. Always trust your senses; if it doesn't look or smell right, don’t eat it. Yes, you can freeze caramel apple dip! However, the texture may change. To freeze, place the dip in a freezer-safe container. Leave space at the top for expansion. Thaw it in the fridge overnight before using. Stir well after thawing to restore creaminess. If it seems too thick, add a little cream or milk to adjust. Enjoy this treat even after freezing! For the full recipe, check back above. To make homemade caramel, you need just three simple ingredients: sugar, butter, and cream. Start by heating one cup of sugar in a saucepan over medium heat. Stir it constantly until it melts and turns golden brown. Once melted, add 6 tablespoons of butter and mix well. After the butter melts, slowly add half a cup of heavy cream. Stir until smooth. Be careful, as the mixture is very hot. Let it cool before using it for the dip. Yes, you can use store-bought caramel sauce instead of making your own. The main pro is convenience; it saves time and effort. Some brands offer great flavor and consistency. However, homemade caramel gives a richer taste and allows you to control the sweetness. If you are short on time, store-bought is a good option. If you want to impress guests, homemade is the way to go. For dipping, I recommend using Granny Smith and Honeycrisp apples. Granny Smith apples are tart and crisp, which contrasts nicely with sweet caramel. They hold up well when sliced. Honeycrisp apples are sweet and juicy, providing a delightful bite. Other great options are Fuji and Gala apples, which are also sweet and have a nice crunch. Choose apples that you enjoy for the best experience! You've learned how to create a tasty caramel apple dip from fresh apples and a creamy base. We discussed ingredient choices, step-by-step instructions, and tips for serving. You're now ready to impress at any gathering with your dip. Remember, you can get creative with flavors and presentations. Enjoy every bite and have fun experimenting with variations that suit your taste!

Caramel Apple Dip Simple and Delicious Recipe

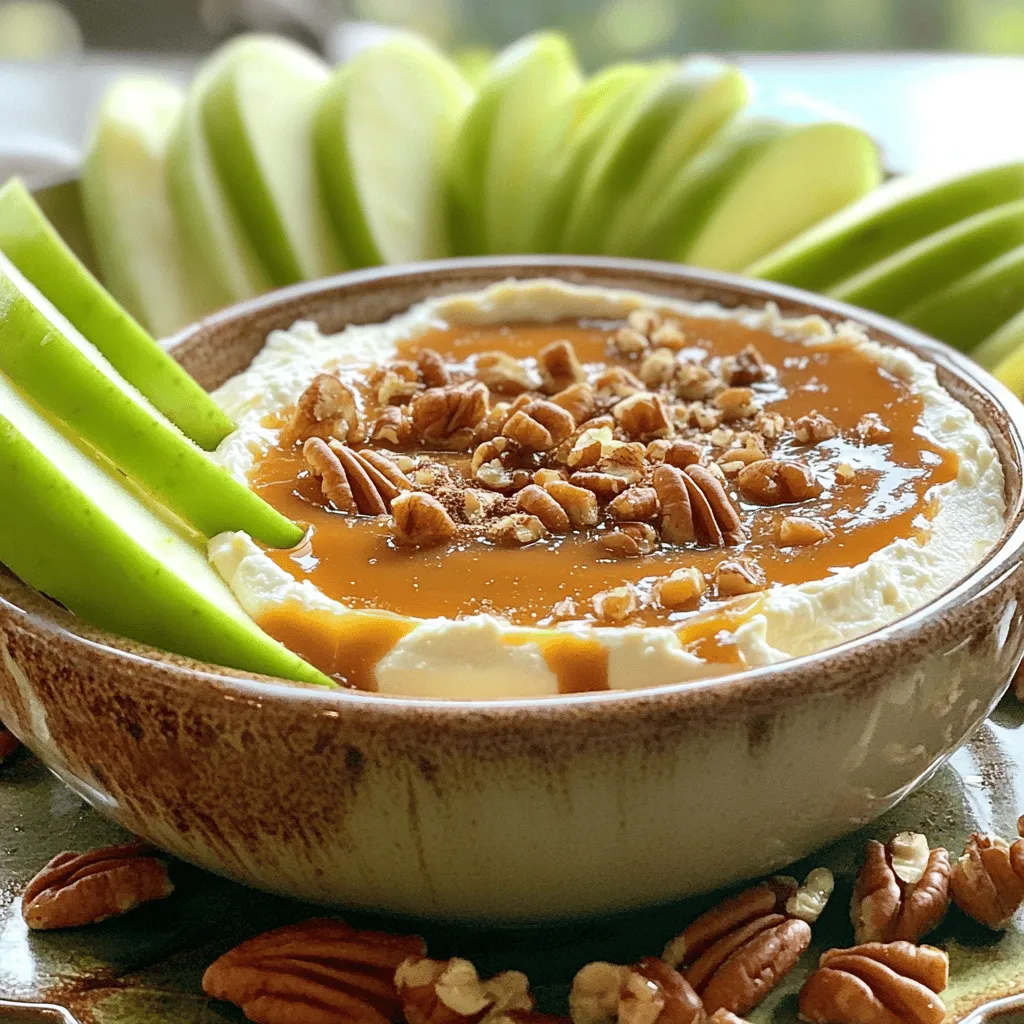
Are you craving a fun and tasty snack? Look no further! This simple and delicious Caramel Apple Dip recipe will

To make a Peach Caprese Salad, you need fresh and simple ingredients. Here’s what you will need: - Ripe Peaches - Fresh Mozzarella - Basil Leaves - Extra-Virgin Olive Oil - Balsamic Glaze - Seasoning (Salt and Pepper) Using ripe peaches makes this salad sweet and juicy. Fresh mozzarella adds creaminess, while basil gives it a lovely aroma. Extra-virgin olive oil brings richness, and balsamic glaze provides a sweet tang. Don’t forget a pinch of salt and pepper for balance. Together, these ingredients create a dish that is fresh and flavorful. You can find the full recipe to guide you through the process. - Washing and Slicing Peaches Start by washing your peaches under cool water. This step removes dirt and wax. After rinsing, slice the peaches into thin wedges. Make sure to remove the pit. You want soft, juicy pieces for the best flavor. - Slicing Fresh Mozzarella Next, take your fresh mozzarella and slice it into rounds. Aim for similar thickness to the peach slices. This helps with layering and keeps the look even. Fresh mozzarella adds creaminess that balances the dish. - Arranging Peaches and Mozzarella On a large platter, begin to place the peach and mozzarella slices in an alternating pattern. This creates a colorful display. Think of it as a work of art on your plate. Make sure to leave space for the basil. - Tucking in Basil Leaves Now it’s time for the fresh basil leaves. Tuck them between the peach and mozzarella slices. This adds a fragrant touch and brightens the dish. The basil also brings a fresh taste that pairs well with the sweetness of the peaches. - Drizzling with Olive Oil Grab your extra-virgin olive oil and drizzle it over the whole salad. This enhances the flavors and adds richness. A little goes a long way, so be mindful of the amount. - Adding Balsamic Glaze Next, drizzle balsamic glaze over the salad. The sweet and tangy notes of the glaze elevate the dish. It creates a lovely contrast with the creamy mozzarella and sweet peaches. - Seasoning with Salt and Pepper Finish with a sprinkle of salt and freshly cracked black pepper. This simple step balances the flavors. The salt enhances the sweetness of the peaches, while the pepper adds a bit of spice. Optionally, let it sit for about 5 minutes before serving. This allows the flavors to mingle beautifully. For the complete recipe, check out the [Full Recipe]. When making Peach Caprese Salad, the peach is key. You want ripe peaches. Ripe peaches feel slightly soft but not mushy. Overripe peaches can spoil the dish. Look for peaches with a nice color and a sweet smell. There are many peach varieties. Freestone peaches are easy to slice. Clingstone peaches have pits that stick. Both can work well in this salad. Try to pick local peaches for the best taste. For mozzarella, fresh is best. Fresh mozzarella has a soft texture and creamy flavor. It pairs well with the sweet peaches. Regular mozzarella can work, but it lacks the same taste. If you want extra creaminess, use burrata. Burrata is a type of fresh mozzarella with a soft center. It adds a rich texture to your salad. To make your salad even better, add nuts or seeds. Toasted pine nuts or sliced almonds bring a nice crunch. They also add healthy fats. You can also use other herbs for flavor. Mint or cilantro can give a fresh twist. Experiment with what you have at home. Each addition can create a new taste experience. For the full recipe, check out the detailed instructions that guide you through each step. {{image_2}} You can change your Peach Caprese Salad to fit each season. For a twist, use strawberries. They add a sweet taste and bright color. Just slice them like the peaches and mix them in. If you want creaminess, add avocado. The soft texture pairs well with mozzarella. Slice the avocado thin and place it between the peaches and mozzarella. This addition makes the salad richer. Try different dressings to change the flavor. A citrus vinaigrette can brighten the dish. Mix fresh lemon juice with olive oil for a zesty touch. You can also add honey for sweetness. Herb-infused oils are another great choice. Use oils flavored with basil or rosemary. This adds a nice herbal note and enhances the overall flavor of the salad. Serving style can make a big difference. Individual serving glasses are fun and fancy. Layer the salad in a glass to show off the colors. It makes each portion feel special. You can also use layered salad bowls. Stack the peaches, mozzarella, and basil. This method allows everyone to see the tasty layers. It’s an easy way to impress guests at any gathering. For the full recipe, check out the complete instructions above. Store your Peach Caprese Salad in the fridge. Use an airtight container to keep it fresh. Try to eat it within a day for the best taste. The longer it sits, the soggier it can get. If you only make half the salad, save the extra ingredients separately. Keep the peaches and mozzarella apart until you are ready to serve. Fresh peaches last about three to five days in the fridge. Look for firm peaches for the best flavor. Mozzarella should stay fresh for about a week. Check the date on the package. If you see any signs of spoilage, it's best to toss it out. Fresh basil can wilt quickly. Use it within a few days for peak flavor. If you want to prep ahead, slice the peaches and mozzarella but don’t assemble the salad. Keep them separate until you're ready to eat. This way, the salad stays fresh and crisp. You can mix the olive oil and balsamic glaze in a small jar. Drizzle it on just before serving. This keeps the flavors bright and tasty. For the full recipe, refer back to the earlier section. You can use canned peaches, but fresh peaches taste better. Canned peaches are sweet and soft. They can add a quick option for busy days. However, they often have added sugar and syrup. This can change the flavor of your salad. Fresh peaches have a crunch and bright taste. If you use canned peaches, rinse them well to reduce sweetness. You can add many fun ingredients to your salad. Here are some suggestions: - Arugula: It adds a peppery flavor. - Prosciutto: This salty meat pairs well with sweet peaches. - Nuts: Try walnuts or pistachios for a nice crunch. - Feta Cheese: It gives a crumbly and tangy touch. - Honey: A drizzle can enhance the sweetness of the peaches. Feel free to mix and match these ingredients for your own twist! To check if your peaches are ripe, use these signs: - Feel: Ripe peaches should be slightly soft when you press them. - Color: Look for a warm, golden hue. The more color, the riper. - Smell: A sweet aroma means they're ready to eat. Ripe peaches are perfect for your salad. They add sweetness and juiciness. Check your peaches often during the summer for the best flavor. To wrap up, we explored the simple yet flavorful Peach Caprese Salad. You learned the key ingredients, like ripe peaches and fresh mozzarella, and followed the clear steps for preparation and assembly. I also shared tips for choosing the best peaches and variations to keep things exciting. This salad is versatile and easy to make. It offers a fresh taste perfect for any season. Try adding your own twist, and enjoy!

Peach Caprese Salad Fresh and Flavorful Summer Dish

Looking for a fresh, tasty dish to brighten your summer table? This Peach Caprese Salad combines ripe peaches, creamy mozzarella,

- 4 medium zucchini - 1 cup quinoa, rinsed and drained - 2 cups vegetable broth or water - 1 cup cherry tomatoes, halved - 1 red bell pepper, diced - 1 small red onion, finely chopped - 1 cup spinach, chopped - 1 teaspoon garlic powder - 1 teaspoon cumin - 1 teaspoon paprika - Salt and pepper to taste - 1 cup shredded mozzarella cheese (or dairy-free cheese for vegan option) - Fresh basil leaves for garnish - Balsamic glaze - Fresh herbs (like parsley or thyme) - Additional vegetables for extra texture When you shop for zucchini, look for ones that feel firm and heavy. Ripe zucchini should have smooth skin without blemishes. Choose organic if you can, as it helps keep the dish healthy and tasty. Organic zucchini often tastes better and has fewer pesticides. By selecting the right zucchini, you set the stage for a great dish. Fresh, ripe zucchini makes your Vegetarian Stuffed Zucchini shine with flavor. For the full recipe, check out the details provided. 1. Preheat your oven to 375°F (190°C). This heats your kitchen and warms up the baking sheet. 2. Prepare a baking sheet by lining it with parchment paper. This helps with easy cleanup. 3. Cut the zucchini in half lengthwise. Use a spoon to scoop out the center. Leave a bit of flesh around the edges to keep them sturdy. Set the scooped flesh aside for later. 1. In a medium pot, add 1 cup of rinsed quinoa and 2 cups of vegetable broth or water. Bring it to a boil. 2. Once boiling, reduce the heat. Cover the pot and let it simmer for about 15 minutes. The quinoa should be fluffy when ready. 3. In a large skillet, heat over medium heat. Add the chopped onion and bell pepper. Sauté them for 3-4 minutes until they soften. 4. Next, add the scooped zucchini flesh, halved cherry tomatoes, chopped spinach, garlic powder, cumin, paprika, salt, and pepper. Cook for 5 more minutes. This step builds rich flavors. 1. In the skillet, stir in the cooked quinoa and half of the mozzarella cheese. Mix well. You want everything to blend nicely. 2. Take the hollowed zucchini halves and place them on your baking sheet. Spoon the quinoa mixture into each half. Press down slightly to pack it well. 1. Top each stuffed zucchini with the remaining mozzarella cheese. This will create a lovely, golden crust. 2. Bake in the preheated oven for 25-30 minutes. The zucchini should be tender, and the cheese should be bubbly. 3. When done, let them cool for a few minutes. Garnish with fresh basil leaves before serving. Enjoy this colorful dish warm! For the complete recipe, check out the [Full Recipe]. Avoid overcooking zucchini. When you bake it too long, it becomes mushy. You want it tender but still a bit firm. Keep an eye on the time. Also, under-seasoning the filling is a common issue. The flavors of the filling should pop. Use enough salt and spices to enhance the taste. Don’t be shy with the garlic powder and cumin! To keep zucchini firm, don't bake it for too long. Start checking at 25 minutes. If you want a slight crunch, pull it out a bit early. Balance flavors in your filling. Mix sweet cherry tomatoes with savory spices. Add a touch of fresh basil for brightness. This combo makes each bite exciting. Serve stuffed zucchini with a simple side salad. A fresh green salad pairs well. You can also try garlic bread for a hearty touch. For drinks, a crisp white wine works great. Try a Sauvignon Blanc or a light rosé. These drinks enhance the flavors of your dish. If you want more ideas, check the Full Recipe for tips on perfect pairings. {{image_2}} You can change the filling in stuffed zucchini to keep it fun. Lentils or beans add great protein. They make the dish hearty and healthy. You can also try using brown rice or barley instead of quinoa. If you want to sneak in more veggies, add mushrooms or corn. This way, every bite is packed with flavor and nutrients. You can cook stuffed zucchini in different ways. Grilling gives it a nice smoky taste. It can also add some fun grill marks. Baking is a classic method that keeps the zucchini soft. You can also use an Instant Pot for a fast meal. Just set it to cook for about 5 minutes, and you’ll have a tasty dish in no time. You can easily adjust this recipe for different diets. If you want it vegan, swap the mozzarella cheese for dairy-free cheese. You can also use nutritional yeast for a cheesy flavor without dairy. If you need gluten-free options, make sure to use gluten-free grains. This way, everyone can enjoy this tasty meal. For the full recipe, check out the complete guide above. You can store leftover stuffed zucchini in the fridge. First, let them cool to room temperature. Then, place them in an airtight container. Keep them in the fridge for up to four days. If you want to freeze stuffed zucchini, wrap each one tightly in plastic wrap. Then, place them in a freezer-safe bag. They can last in the freezer for about three months. To reheat stuffed zucchini, you have a few options. The best method is to use the oven. Preheat the oven to 350°F (175°C). Place the zucchini on a baking sheet and cover with foil. Heat for about 15 minutes, until warmed through. You can also use the microwave for quick reheating. Place the zucchini on a microwave-safe plate. Heat for 2-3 minutes, checking to avoid sogginess. Stuffed zucchini can last in the fridge for about four days. Always check for signs of spoilage. Look for any off smells, discoloration, or mushy texture. If you notice any of these signs, it’s best to toss them. This ensures you enjoy your meals safely. For more details on this recipe, check out the Full Recipe. Baking stuffed zucchini takes about 25-30 minutes at 375°F (190°C). The time may change based on your oven and the size of your zucchini. Thinner zucchini cooks faster, while thicker ones need more time. Always check for tenderness before serving. Yes, you can make stuffed zucchini ahead of time. Prepare the filling and stuff the zucchini. Cover and refrigerate for up to a day. When you're ready to bake, add a few extra minutes to the cooking time. This makes meal prep easy. If you want to swap quinoa, try rice or couscous. You can also use farro or barley for a different taste. These grains offer a nice texture and flavor. Experiment with what you have on hand. Stuffed zucchini is very healthy. Zucchini is low in calories and high in water. The quinoa adds protein and fiber. Fresh veggies like spinach and tomatoes boost vitamins. This dish is a great way to enjoy a balanced meal. Yes, you can make stuffed zucchini without cheese. Use nutritional yeast for a cheesy flavor. You can also add more veggies or nuts for texture. This keeps the dish tasty and creamy without dairy. Vegetarian stuffed zucchini is simple and tasty. You learned about the main ingredients, plus optional toppings. I shared steps for preparation, cooking, and baking. You now have tips to avoid common mistakes and how to achieve perfect texture. Remember that variations exist for every diet. This dish fits many meals and can be prepared ahead. Enjoy creating your own version! Trust me, you will love the flavor and health benefits in every bite.

Vegetarian Stuffed Zucchini Flavorful and Healthy Dish

Looking for a tasty and healthy dish that’s easy to make? Try my Vegetarian Stuffed Zucchini! This dish is packed

To make the caramel apple cheesecake dip, you will need the following ingredients: - 8 oz cream cheese, softened - 1/2 cup powdered sugar - 1 teaspoon vanilla extract - 1 cup sour cream - 1/2 cup caramel sauce (plus extra for drizzling) - 1 medium apple, diced (preferably Granny Smith) - 1/4 cup chopped nuts (walnuts or pecans) - 1 teaspoon cinnamon - Sliced apples and graham crackers for dipping These ingredients blend together to create a creamy, sweet dip. The cream cheese gives it that rich texture. The powdered sugar adds sweetness, while the vanilla extract brings a warm flavor. The sour cream adds a nice tang that balances the sweetness. Using a tart apple like Granny Smith enhances the flavor. The nuts add a crunchy texture and a taste boost. Cinnamon gives a warm, cozy vibe. The caramel sauce ties it all together with its sweet, buttery goodness. For serving, sliced apples and graham crackers make perfect dippers. You can even drizzle more caramel on top for extra sweetness. This dip is sure to impress your guests. For the full recipe, check out the detailed steps. To make Caramel Apple Cheesecake Dip, gather all your ingredients first. This recipe is simple and quick, taking only 15 minutes. You need cream cheese, powdered sugar, vanilla extract, sour cream, caramel sauce, an apple, nuts, cinnamon, and some dippers. I like to use Granny Smith apples for a nice tartness. 1. Cream the Cheese: Start by placing your softened cream cheese in a mixing bowl. Use an electric mixer to beat it until it's smooth. 2. Add Sugar: Gradually mix in the powdered sugar. Keep mixing until it blends fully and looks creamy. 3. Incorporate Flavors: Stir in the vanilla extract and sour cream. Blend until the mixture is smooth and free of lumps. 4. Fold in Add-Ins: Gently fold in half of the diced apple, the chopped nuts, and the cinnamon. Make sure everything is evenly mixed. 5. Swirl in Caramel: Drizzle in the caramel sauce. Gently swirl it into the dip to create a pretty marbled effect. Save some caramel for later. Transfer the dip to your favorite serving bowl. Top it with the remaining diced apples, a sprinkle of nuts, and a generous drizzle of caramel sauce. Serve with sliced apples and graham crackers for dipping. This dip is sure to impress your guests! You can find the Full Recipe for more details. To make your dip creamy, use softened cream cheese. Beat it well until smooth. Mixing in powdered sugar helps to sweeten and soften. Sour cream adds a nice tang and creaminess. Fold in apples and nuts gently to keep chunks intact. This gives a great texture to your dip. Serve your dip in a fun bowl to catch eyes. Top it with diced apples and nuts for color. Drizzle extra caramel sauce on top for a sweet touch. Use sliced apples and graham crackers around the bowl. This makes it easy for guests to dip in. You can even add a small sign for fun. You can prepare this dip a day early. Just mix it and store in the fridge. Keep the caramel drizzle separate until serving. This keeps the dip fresh and tasty. If you want a quick snack, this is a great choice. For the full recipe, check the details above. {{image_2}} You can easily switch things up with this dip. Adding chocolate or peanut butter can bring new flavors. For chocolate lovers, mix in chocolate chips or drizzle melted chocolate on top. If you want a nutty twist, peanut butter fits well. Just blend it into the cream cheese mix. Using different types of apples can change the taste too. Granny Smith apples are tart and crisp, but you can try Honeycrisp or Fuji apples. Each apple type adds its own flavor and texture. Experiment to find your favorite! If you need gluten-free options, use gluten-free graham crackers for dipping. This way, everyone can enjoy the dip without worry. You can also make it dairy-free. For this, swap cream cheese with a vegan cream cheese. Use coconut yogurt instead of sour cream. These simple changes keep the flavor and creaminess. With these variations, your Caramel Apple Cheesecake Dip can suit many tastes and diets. Whether it's a party or a simple snack, enjoy creating your own version! For the detailed recipe, check the Full Recipe. To keep your Caramel Apple Cheesecake Dip fresh, store it in an airtight container. Make sure to seal it well to prevent air from getting in. This dip can also be covered with plastic wrap. If you have leftover caramel sauce, keep it in a separate container. This helps maintain the dip’s texture and flavor. When stored properly, this dip lasts about 3 to 5 days in the fridge. After that, the flavors may fade. Always check for any change in smell or appearance before eating. If the dip looks or smells off, it’s best to toss it. You do not need to reheat the dip. This treat is best served cold or at room temperature. If you want to warm the caramel sauce, place it in the microwave for about 10 seconds. Stir it well and drizzle it over the dip just before serving. For the full recipe, check the details above. The best type of apple for this dip is Granny Smith. They are tart and crunchy. This tartness balances the sweetness of the caramel and cream cheese. Other apples may work, but Granny Smith gives the best flavor contrast. Try using a mix of apples for extra taste! Yes, you can make this dip ahead of time. Prepare it up to 24 hours before serving. Store it in an airtight container in the fridge. This allows the flavors to blend well. Just add extra caramel and toppings before serving for a fresh look! Caramel Apple Cheesecake Dip lasts about 3 to 5 days in the fridge. Keep it covered tightly to keep it fresh. If you notice any strange smell or color, it’s best to toss it. This dip is so tasty, it might not last long anyway! Serve the dip with sliced apples and graham crackers. These pair well and add crunch. You can also use pretzels or cookies for a twist. For a fun touch, add caramel sauce on top before serving. This will make it even more inviting and delicious! For the full recipe, check out the detailed instructions above. Caramel Apple Cheesecake Dip is a crowd-pleaser. It combines smooth cream cheese with sweet caramel and crisp apples. This dip is easy to make and perfect for parties. You only need 15 minutes to prepare it. The mix of flavors and textures is delightful. You can serve it with sliced apples and graham crackers for dipping. Everyone will want to try it! This dip serves 6 to 8 people. Each serving contains: - Calories: About 200 - Fat: 10g - Carbohydrates: 25g - Protein: 2g - Sugar: 10g This dip is not only tasty but also offers some nutrients from the apples and nuts. The calories and fats come mainly from cream cheese and caramel. If you want a lighter option, you can use low-fat cream cheese. Enjoy this sweet treat and share it with friends! For the complete recipe, check out the Full Recipe section above. This blog post covered the delicious Caramel Apple Cheesecake Dip. We discussed the key ingredients, like cream cheese and caramel sauce, and the easy steps to make it. I shared tips for the best texture and exciting variations. Storing your dip properly keeps it fresh longer. To sum it up, this dip is versatile and fun. You can serve it for any occasion, and everyone will love it. Enjoy making and sharing this tasty treat!

Caramel Apple Cheesecake Dip Tasty Party Treat

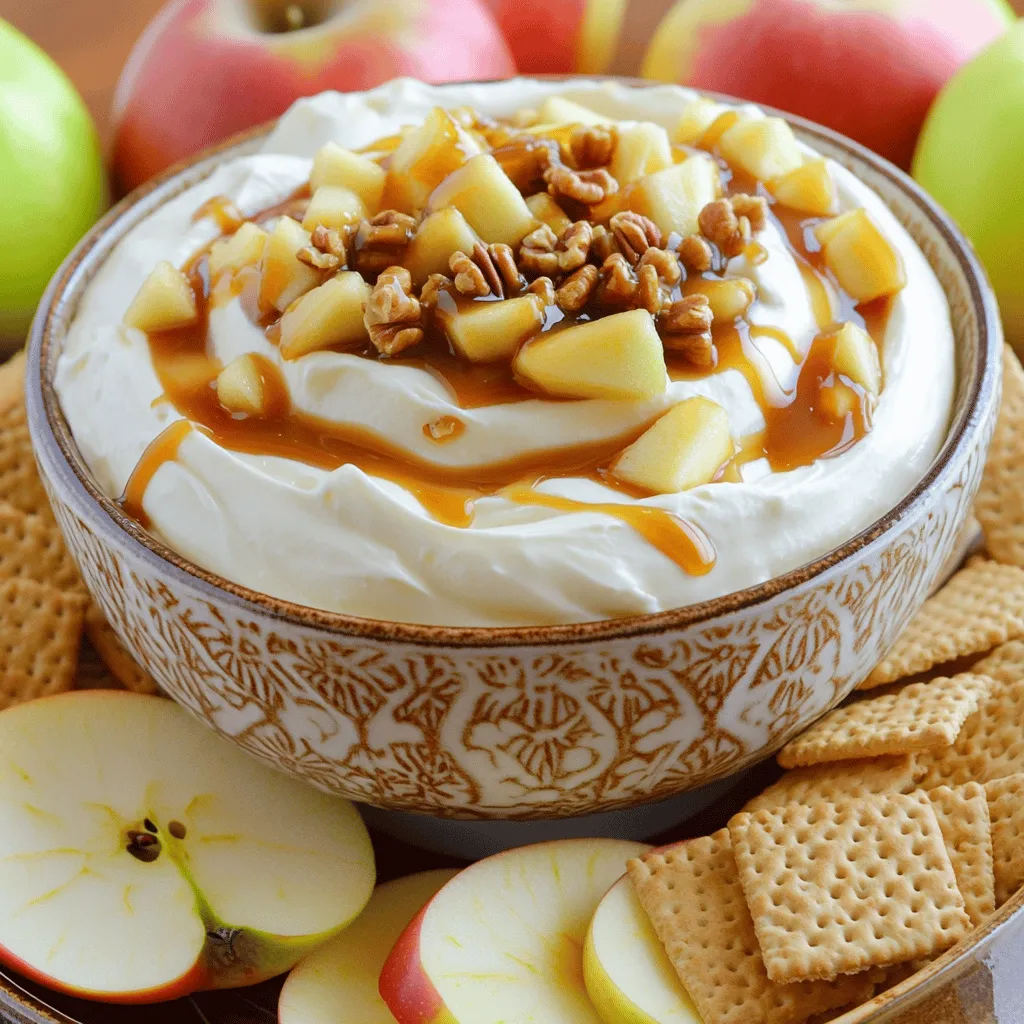
Get ready to impress your friends with a treat that combines creamy, cheesy goodness with the sweet crunch of apples.

- 1 cup long-grain white rice - 2 cups vegetable broth (or water) - 1 bunch fresh cilantro, finely chopped - 1 lime (zest and juice) - 1 tablespoon olive oil - 1 teaspoon garlic powder - 1 teaspoon onion powder - Salt to taste Each ingredient plays an important part in this dish. The long-grain white rice gives a light and fluffy texture. Vegetable broth adds rich flavor, making the rice taste better than just plain water. Fresh cilantro brings a bright, herbal note. Lime juice and zest offer a burst of tanginess that lifts the dish. Olive oil helps keep the rice moist and adds smoothness. Garlic and onion powders enhance the depth of flavor, while salt pulls everything together. You can easily swap ingredients to fit your needs. If you want a vegan dish, stick with vegetable broth. For a gluten-free option, use gluten-free broth or water. Brown rice works well for a healthier choice, but it takes longer to cook. You can replace cilantro with parsley if you dislike its taste. If you want a spicy kick, add jalapeños or chili powder. For a creamier version, try adding a spoonful of coconut milk. Check out the Full Recipe for more ideas! 1. Start by rinsing 1 cup of long-grain white rice under cold water. This helps get rid of extra starch. Rinse until the water runs clear. 2. In a medium saucepan, heat 2 cups of vegetable broth over medium heat. You can also use water if you prefer. 3. Once the broth is boiling, add the rinsed rice, 1 tablespoon of olive oil, 1 teaspoon of garlic powder, 1 teaspoon of onion powder, and a pinch of salt. Stir to mix all the ingredients. 4. Cover the saucepan and turn the heat down to low. Let the rice simmer for 18 to 20 minutes. You want all the liquid to soak in, leaving the rice tender. 5. When the rice is done, remove the saucepan from heat. Keep it covered for 5 minutes. This helps the rice to steam and become fluffy. 6. Fluff the rice with a fork. Add the zest and juice of 1 lime and 1 bunch of finely chopped cilantro. Stir gently to mix in all the flavors. 7. Taste and add more salt if you need to. Rinsing the rice is key for good texture. If you skip this step, your rice can become sticky. Always rinse until the water is clear. When cooking, use a tight-fitting lid. This keeps steam in and helps the rice cook evenly. Keep an eye on the heat. Too high, and the rice can burn. Letting the rice rest is very important. This step allows the grains to firm up. Fluffing with a fork separates the grains. You want each bite to be light and airy. If you skip resting, the rice may clump together. Enjoy your flavorful side dish with any meal! Check the Full Recipe for more details. To make your cilantro lime rice pop, try adding some extra ingredients. You can mix in black beans for protein and texture. Chopped bell peppers can add crunch and color. If you like heat, diced jalapeños will spice things up. For a touch of sweetness, throw in some corn. Each ingredient adds a new layer of flavor. One big mistake is not rinsing the rice. Rinsing removes excess starch and helps prevent gummy rice. Another error is overcooking the rice. Keep an eye on the timer and avoid stirring too much while it cooks. Lastly, don’t skip the resting time after cooking. This step lets the rice firm up and makes it fluffy. To achieve fluffy rice, I always recommend using the right water-to-rice ratio. For long-grain white rice, two cups of water for every cup of rice works well. After cooking, let the rice sit covered for about five minutes. Fluff it gently with a fork to separate the grains. This simple trick makes all the difference! For the full recipe, check out the Zesty Cilantro Lime Rice section. {{image_2}} Adding black beans makes this rice dish heartier. Black beans bring protein and fiber. To make this, mix one cup of cooked black beans into the rice before adding cilantro and lime. The beans add a nice texture and enhance the flavor. This twist is great for a filling meal. You can also top it with avocado or salsa for more taste. If you want a healthier option, try using brown rice or quinoa. Brown rice has more fiber and nutrients than white rice. Cook it the same way as white rice, but note it may take longer to cook. Quinoa is another great choice. It cooks faster than brown rice and is packed with protein. Just rinse it well before cooking. This change keeps the dish flavorful while boosting its health benefits. For a kick, add jalapeños to your cilantro lime rice. Start by dicing one or two jalapeños based on your heat preference. Sauté them in olive oil for a few minutes before adding the rice and broth. This step infuses the dish with spice and flavor. Remember to adjust the salt to balance the heat. Spicy rice pairs well with grilled meats or as a standalone dish. For a full recipe, check out the Zesty Cilantro Lime Rice. After making your Cilantro Lime Rice, you may have some left. To store it, let the rice cool to room temperature. Then, transfer it to an airtight container. This helps keep the rice fresh. Store it in the fridge for up to four days. If you want to keep it longer, freezing is a good option. When you're ready to eat the rice again, reheating is key. You can use a microwave or a stovetop. For the microwave, place the rice in a bowl. Add a splash of water to keep it moist. Cover the bowl with a lid or plastic wrap. Heat it in short bursts, stirring in between. On the stovetop, add the rice to a pan with a little water. Heat over low heat, stirring often until warm. To freeze Cilantro Lime Rice, first cool it completely. Then, scoop it into freezer-safe bags or containers. Make sure to press out any air to avoid freezer burn. Label the bags with the date. This rice can last up to three months in the freezer. When you want to eat it, just thaw it in the fridge overnight before reheating. This way, you'll enjoy its fresh flavor again. For the full recipe, check the earlier section! The best rice for Cilantro Lime Rice is long-grain white rice. It cooks light and fluffy. Basmati or jasmine rice works well too. These types have a lovely aroma and texture. They soak up flavors from the broth and lime. Yes, you can easily make this dish vegan. Just use vegetable broth instead of chicken broth. All other ingredients in the recipe are already plant-based. This allows everyone to enjoy the zesty flavor. To serve more people, simply double or triple the ingredients. Keep the same cooking time, but check for doneness. You can also cook in batches if your pot is small. This way, you ensure each grain cooks perfectly. Cilantro Lime Rice pairs well with many dishes. Try serving it with grilled chicken, fish, or tacos. You can also use it as a base for a burrito bowl. Add black beans, corn, and avocado for a tasty meal. Cilantro Lime Rice likely has roots in Mexican cuisine. It has become popular in many restaurants today. Its bright and fresh flavor makes it a favorite side dish. The combination of cilantro and lime is classic in many Latin dishes. For a complete guide, check out the Full Recipe. Cilantro lime rice is simple but full of flavor. We covered key ingredients, cooking steps, and flavor tips. I shared ways to store leftovers and answered common questions. Remember, the right rice is key for the best dish. With a few swaps, you can meet your dietary needs. Enjoy making this tasty side, and don't hesitate to get creative!

Cilantro Lime Rice Flavorful and Easy Recipe Guide

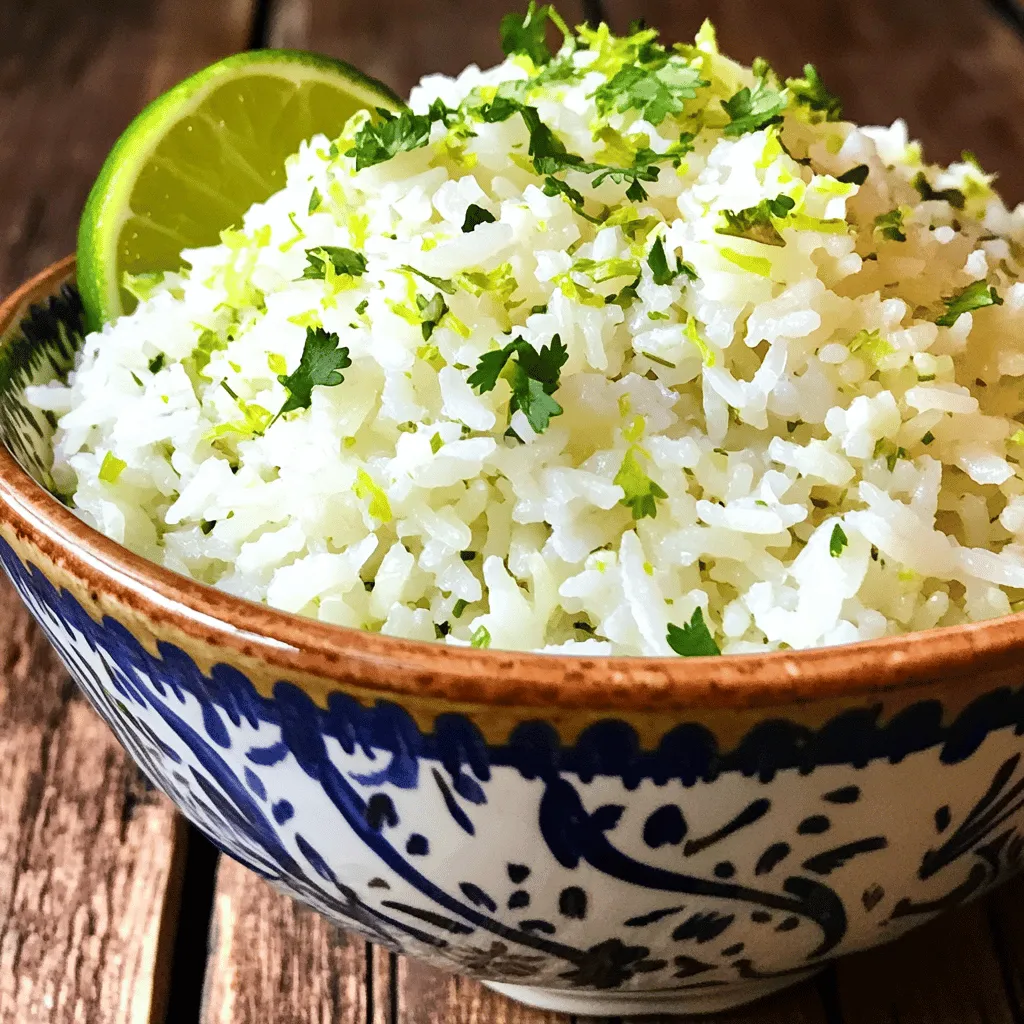
Welcome to your new go-to guide for making Cilantro Lime Rice! This bright, zesty dish adds a burst of flavor

To make a great baked eggplant Parmesan, you need some simple ingredients. Here’s what you will need: - 2 medium eggplants, sliced into ½-inch rounds - Salt (for sweating the eggplant) - 2 cups marinara sauce - 2 cups shredded mozzarella cheese - 1 cup ricotta cheese - 1 cup grated Parmesan cheese - 1 teaspoon dried basil - 1 teaspoon dried oregano - 1 teaspoon garlic powder - ½ teaspoon black pepper - 1 cup breadcrumbs (preferably whole wheat) - Olive oil spray or 2 tablespoons olive oil These ingredients come together to create a tasty and satisfying dish. The eggplants give a unique texture, while the cheeses add rich, creamy flavors. You might want to change some ingredients based on what you have. Here are some substitutions you can use: - Instead of eggplant, try zucchini or mushrooms. - Any pasta sauce works if you don’t have marinara. - For a dairy-free option, use cashew cheese or vegan ricotta. - You can swap mozzarella with any melty cheese like provolone. - Whole wheat breadcrumbs can be replaced with gluten-free options. These swaps keep your dish delicious while catering to different diets. Baked eggplant Parmesan is not just tasty; it can also be healthy. Here’s a quick breakdown of its nutritional benefits: - Eggplants are low in calories and high in fiber. - Ricotta adds protein and calcium. - Marinara sauce offers vitamins from tomatoes. - Mozzarella gives a good source of calcium. - Using whole wheat breadcrumbs boosts fiber content. This dish is rich in nutrients while still being comforting and hearty. Enjoy knowing you’re treating yourself well! For the full recipe, check the provided link. Start by slicing the eggplants into ½-inch rounds. This thickness helps them cook evenly. Lay the slices on a cutting board or paper towels. Sprinkle salt over them. Let them rest for 30 minutes. This step pulls out excess moisture and bitterness. After 30 minutes, rinse the slices under cold water. Pat them dry with paper towels. This ensures your baked dish won’t be soggy. Gather your ingredients and a large baking dish. Spread a thin layer of marinara sauce on the bottom of the dish. Now, add a layer of eggplant slices. Then, spoon dollops of the ricotta cheese mixture over the top. Sprinkle mozzarella cheese on next, followed by some breadcrumbs. Repeat these layers until you use all the ingredients. Finish with marinara sauce, mozzarella, and the rest of the Parmesan cheese. This layering creates a beautiful and tasty dish. Preheat your oven to 375°F (190°C). Cover the baking dish with aluminum foil. Bake for 30 minutes. After that, remove the foil and bake for another 15-20 minutes. Watch for the cheese to bubble and turn golden brown. Once done, let the dish cool for about 10 minutes. This resting time helps the layers set. Now, you’re ready to slice and serve your delicious baked eggplant Parmesan. For the full recipe, check the earlier section. One common mistake is not sweating the eggplant. This step removes moisture and bitterness. Skipping it can leave your dish soggy. Always sprinkle salt and let the slices sit for 30 minutes. Rinsing and drying them well is crucial. Another mistake is not layering the ingredients properly. This can lead to uneven cooking. Make sure to alternate layers of sauce, eggplant, and cheese. This helps flavors mix well and ensures even heat. To get a crispy topping, use breadcrumbs. Whole wheat breadcrumbs work best. Lightly spray them with olive oil before baking. This adds flavor and crunch. You can also mix in some grated Parmesan cheese. It adds a nice golden color and rich taste. Baking with foil helps the dish cook evenly. Remove the foil in the last 15-20 minutes. This allows the top to crisp up nicely. Keep an eye on it to avoid burning. For this recipe, use a large baking dish. A 9x13 inch dish works well. This size allows for even layers. A good cutting board helps when slicing the eggplant. Use a sharp knife for clean cuts. A spatula is handy for layering ingredients. Lastly, an oven mitt is essential. You’ll need it when removing the hot dish from the oven. For the full recipe, check out the details above! {{image_2}} For a vegan twist, swap the dairy. Use cashew cream instead of ricotta. Blend soaked cashews with lemon juice, garlic, and nutritional yeast. This mix gives a creamy texture and rich flavor. Replace mozzarella with vegan cheese shreds. They melt well and keep the dish cheesy. For the topping, consider using crushed nuts or seeds instead of breadcrumbs for crunch. To make this dish gluten-free, choose gluten-free breadcrumbs. Many brands offer tasty options that work great. You can also make your own by blending gluten-free bread. Just dry it out and crush it into crumbs. Another option is to skip the breadcrumbs entirely for a lighter dish. Layer extra vegetables for texture and flavor. Feel free to get creative with your ingredients! Add roasted red peppers for a sweet kick. Spinach or kale can boost the health factor. They add color and nutrients. Try different cheeses like goat cheese for a tangy flavor. You can even use pesto instead of marinara sauce for a unique taste. Each swap can give you a new experience. For the spices, mix in crushed red pepper for heat or fresh herbs for brightness. You can find the Full Recipe for Baked Eggplant Parmesan above to explore these variations! After you make Baked Eggplant Parmesan, let it cool. Once cool, cover it tightly. Use plastic wrap or a lid on your baking dish. This keeps it fresh. Store it in the fridge for up to five days. If you want to keep it longer, consider freezing it instead. You can freeze Baked Eggplant Parmesan for later. First, let it cool completely. Cut it into slices for easy servings. Wrap each slice in plastic wrap. Then, place the slices in a freezer-safe bag. Remove as much air as possible before sealing. This helps prevent freezer burn. You can freeze it for up to three months. When you’re ready to eat, thaw it in the fridge overnight. To reheat your Baked Eggplant Parmesan, preheat your oven to 350°F (175°C). Place the dish in the oven. Cover it with foil to keep it moist. Heat for about 20-25 minutes. If you like a crispy top, remove the foil for the last 5 minutes. You can also reheat individual slices in the microwave for 2-3 minutes. Just make sure they heat evenly. Enjoy your flavorful homemade delight! For the full recipe, check out the full recipe provided above. Yes, you can use other vegetables. Zucchini works well. You can also try mushrooms or bell peppers. Slice them thin like eggplant. This will help them cook evenly. Experimenting with vegetables adds fun flavors and colors. Just remember, each veggie may change cooking time a bit. Baked Eggplant Parmesan can last in the fridge for up to five days. To store, let it cool completely. Cover it tightly with plastic wrap or foil. You can also use an airtight container. For longer storage, freeze it. It can stay good for up to three months in the freezer. Eggplant Parmesan, or Melanzane alla Parmigiana, comes from Italy. The dish has roots in Southern Italy, mainly in Campania and Sicily. People made it to use up leftover eggplant and cheese. Over time, it grew popular worldwide. Now, many cultures enjoy this cheesy, savory treat. You can find many variations around the globe. For the full recipe, check out the main article. Baked Eggplant Parmesan is a tasty dish we explored in detail. We covered its key ingredients, ways to substitute them, and shared important nutrition facts. I provided step-by-step instructions for preparation and baking. You learned tips to avoid common errors and achieve a crispy topping. Variations like vegan and gluten-free options were also discussed. In conclusion, this dish offers flexibility and flavor. Try different ingredients and enjoy your cooking journey.

Baked Eggplant Parmesan Flavorful Homemade Delight

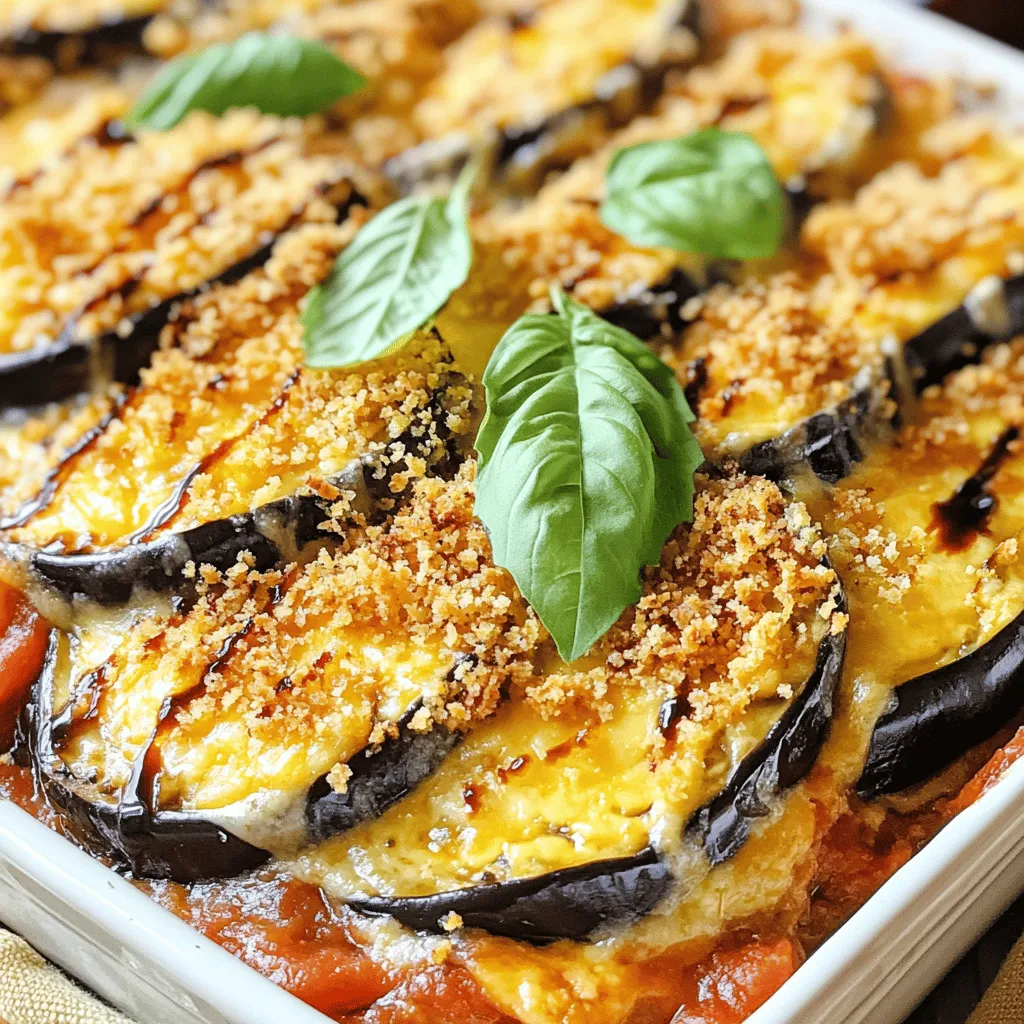
Are you ready to spice up your dinner with a delightful twist on a classic? Baked Eggplant Parmesan is your

To make these tasty Peanut Butter Chocolate Chip Energy Bites, gather these simple ingredients: - 1 cup rolled oats - 1/2 cup natural peanut butter - 1/3 cup honey or maple syrup - 1/4 cup mini chocolate chips - 1/4 cup ground flaxseed - 1/2 teaspoon vanilla extract - A pinch of salt These ingredients are easy to find at any grocery store. The oats add structure, while the peanut butter gives a rich flavor. Honey or maple syrup adds sweetness. Mini chocolate chips give a fun taste that everyone loves. Ground flaxseed adds extra nutrition, and vanilla extract makes everything smell great. Lastly, a pinch of salt balances the sweetness and brings out the flavors. For the full recipe, follow the steps to make these bites in just 10 minutes. Enjoy making this easy snack! To make Peanut Butter Chocolate Chip Energy Bites, follow these simple steps. - Combine dry ingredients in a bowl: Start by taking a large mixing bowl. Add 1 cup of rolled oats, 1/4 cup of ground flaxseed, and a pinch of salt. Stir these dry ingredients well. - Whisk wet ingredients separately: In another bowl, take 1/2 cup of natural peanut butter. Add 1/3 cup of honey or maple syrup and 1/2 teaspoon of vanilla extract. Whisk this mixture until it becomes smooth and creamy. - Mix dry and wet ingredients together: Pour the wet mixture into the bowl with the dry ingredients. Stir everything together until well combined. The mixture should start to come together nicely. - Shape the mixture into energy bites: Use your hands to shape the mixture into small balls, about 1 inch in size. If the mixture feels too sticky, dampen your hands with a little water to help shape the bites. - Refrigerate to set: Place the energy bites on a parchment-lined baking sheet or a plate. Refrigerate them for at least 30 minutes. This helps them firm up and makes them easier to eat. Enjoy your delicious Peanut Butter Chocolate Chip Energy Bites! You can find the full recipe above for exact measurements and tips. - To shape your energy bites easily, ensure the mixture has proper moisture. - If the mixture feels sticky, use damp hands. This helps you shape the bites without mess. - You can customize the sweetness. Try using honey or maple syrup to fit your taste. - For a fun touch, serve your energy bites in snack jars or on decorative plates. - Pair them with fresh fruit. This adds color and nutrition to your snack platter. I love how these little bites can work for any occasion. You can make them for a busy day or a gathering with friends. They are quick to make and taste great! {{image_2}} You can easily change the recipe to suit your taste. If you want a different nut butter, try almond or cashew. These nut butters give a unique flavor. You can also switch sweeteners. Agave syrup or coconut sugar works well in this recipe. For extra crunch and nutrition, add some dried fruits like raisins or cranberries. You can also mix in seeds, such as chia or sunflower seeds. If you want a protein boost, add a scoop of your favorite protein powder. Each option adds a fun twist to these energy bites. If you love chocolate, try a chocolate peanut butter version. Just mix in some cocoa powder with the other ingredients. This will make your bites extra rich and decadent. Another great option is to add spices. A pinch of cinnamon can bring warmth and depth. You could even add a bit more cocoa powder for a double chocolate flavor. These small changes can make your energy bites even more exciting. For the full recipe, check out the Peanut Butter Chocolate Chip Energy Bites section above. To keep your energy bites fresh, store them in airtight containers. This helps prevent them from drying out and keeps them tasty. You can refrigerate them for short-term storage. If you want to save them longer, freezing works great. Just make sure they are in a suitable container to avoid freezer burn. Energy bites will last up to one week in the refrigerator. This gives you time to enjoy them as a quick snack. If you freeze them, they can stay good for up to three months. Just remember to thaw them in the fridge or at room temperature before enjoying. For the full recipe, check out the details above! You can use almond butter or sunflower seed butter. Almond butter adds a nutty flavor. Sunflower seed butter is great for nut allergies. They last about one week in the fridge. If you freeze them, they can last up to three months. Make sure to keep them in an airtight container. Yes, you can make them vegan! Just use maple syrup instead of honey. Also, ensure all ingredients are vegan-friendly. Absolutely! You can use seed butter instead of nut butter. This way, you can enjoy these bites without nuts. These energy bites are tasty and easy to make. We covered ingredients, preparation, and storage. You learned about substitutions for various diets and storage tips for freshness. These bites provide a quick snack or a healthy treat. Feel free to get creative with flavors and ingredients. With simple steps, you can enjoy these energizing bites any time. Enjoy your cooking!

Peanut Butter Chocolate Chip Energy Bites Easy Snack

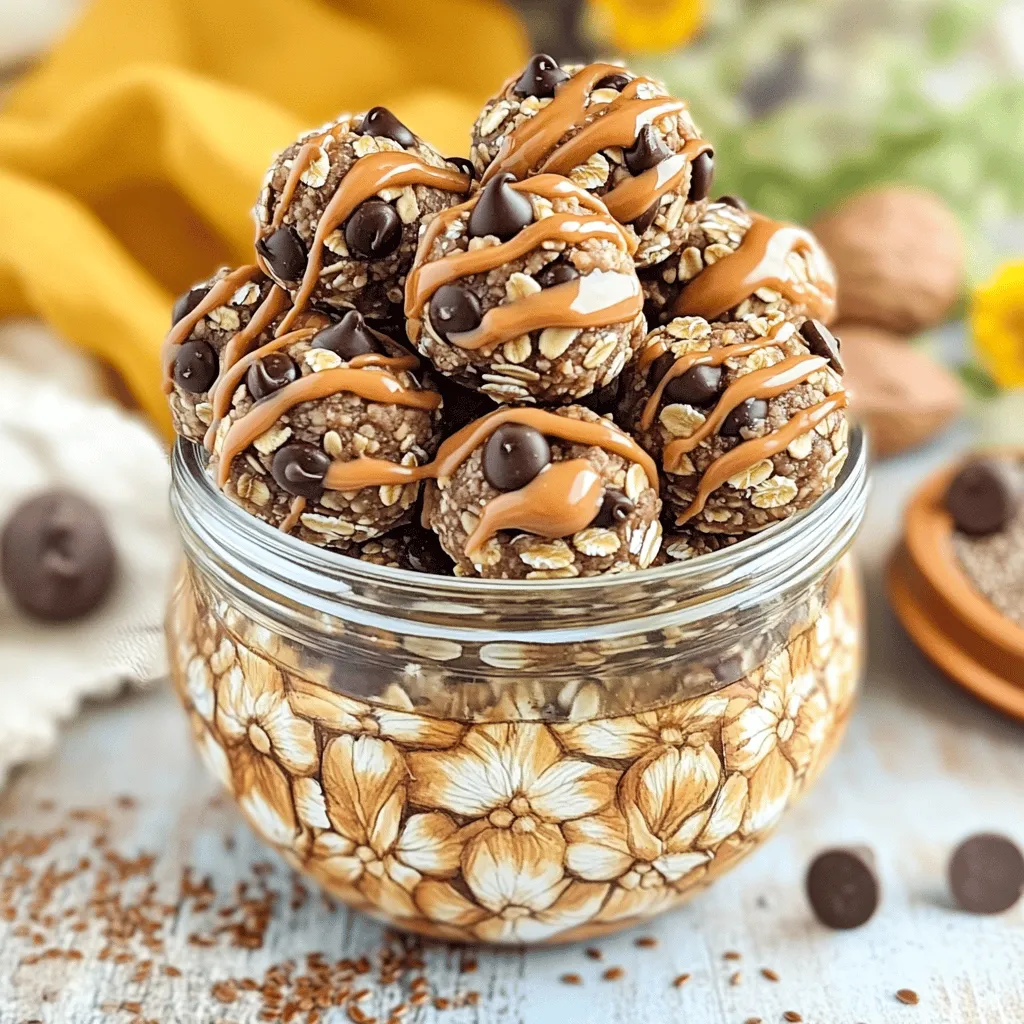
Looking for a tasty and easy snack? You’ll love these Peanut Butter Chocolate Chip Energy Bites! Packed with oats, peanut

- 4 large bell peppers (any color) - 1 cup quinoa, rinsed - 2 cups vegetable broth - 1 can (15 oz) black beans, rinsed and drained - 1 cup corn kernels (fresh or frozen) - 1 medium onion, diced - 2 cloves garlic, minced - 1 teaspoon cumin - 1 teaspoon chili powder - 1 cup diced tomatoes (fresh or canned) - 1 cup shredded cheese (cheddar or Monterey Jack) - 2 tablespoons olive oil - Salt and pepper to taste - Fresh cilantro, for garnish - Prep Time: 15 min - Total Time: 1 hr - Servings: 4 When I cook stuffed bell peppers, I always have a colorful mix on my counter. It makes prep fun and easy! You only need a few simple ingredients. I love using quinoa for its nutty flavor and great texture. The black beans add protein, while the corn gives sweetness. The spices, like cumin and chili powder, bring warmth and depth to the dish. Don't forget the cheese! It melts beautifully on top and adds creaminess. I also like to use fresh cilantro for garnish. It adds a pop of color and bright flavor. When you gather these ingredients, you are ready to start cooking! If you want to follow along step-by-step, check the Full Recipe for detailed instructions. - Preheat the oven to 375°F (190°C). - Cut the tops off the bell peppers and remove seeds and membranes. Start by getting your oven hot. This helps cook the peppers evenly. Next, take your bell peppers and cut off the tops. Make sure you remove all the seeds and membranes inside. This will make space for the tasty filling. Set the cleaned peppers aside while you prepare the filling. - Heat olive oil in a medium saucepan; add diced onion until translucent. - Stir in garlic, cumin, and chili powder; cook until fragrant. - Add quinoa and vegetable broth, bring to a boil, then simmer. In a medium saucepan, heat two tablespoons of olive oil over medium heat. Toss in the diced onion and cook it until it turns soft and clear. This takes about three to four minutes. Next, add minced garlic, cumin, and chili powder. Stir this mix for a minute to wake up the spices. Now, add one cup of rinsed quinoa and two cups of vegetable broth. Bring the mixture to a boil. Once it boils, lower the heat, cover it, and let it simmer. In about 15 to 20 minutes, the quinoa will be fluffy and ready. - Mix cooked quinoa with black beans, corn, tomatoes, and cheese. - Stuff the bell peppers with the mixture and arrange in a baking dish. - Cover with foil and bake, then top with remaining cheese and bake uncovered. In a large bowl, combine your cooked quinoa with one can of rinsed black beans, one cup of corn, one cup of diced tomatoes, and half of the shredded cheese. Season with salt and pepper to taste. Now, gently stuff each bell pepper with this mixture. Make sure to pack it down a little so it fits well. Place the stuffed peppers upright in a baking dish. Add a splash of water to help steam them as they cook. Cover the dish with foil and bake for 30 minutes. After that, remove the foil and add the rest of the cheese on top of each pepper. Bake uncovered for another 10 to 15 minutes until the cheese is melted and bubbly. If you want the full recipe, check it out in the ingredients section! To make your stuffed bell peppers just right, you need to pack the stuffing tightly. This ensures every bite is full of flavor. I also recommend using different colored bell peppers. They make your dish look more vibrant and fun. You can cook stuffed bell peppers in the oven or on the stovetop. Baking them gives a nice, roasted flavor and a tender texture. If you use the stovetop, you might get a slightly softer texture. Both methods work well, so try both to see which you like better! These stuffed peppers are great on their own, but you can take them to the next level. Pair them with a fresh side salad for crunch or some crusty bread to soak up all the delicious juices. It makes for a complete, satisfying meal. For more details on preparing stuffed bell peppers, check the Full Recipe. {{image_2}} You can change the filling in stuffed bell peppers to fit your taste. If you want meat, try using ground turkey or beef. Both options add a nice flavor and protein boost. For a vegetarian version, swap the quinoa with rice or other grains. This keeps the dish hearty and satisfying. If you're following a gluten-free diet, use certified gluten-free ingredients. This way, you can enjoy your stuffed peppers without worry. For a vegan option, simply leave out the cheese. You can use plant-based cheese or skip it entirely. These changes still give you a tasty meal. To add some excitement, consider spices like paprika or cayenne for heat. Just a pinch can make a big difference. You can also top your peppers with avocado or sour cream. This adds creaminess and takes the dish to the next level. Enjoy trying these variations to find your favorite combination! To keep your stuffed bell peppers fresh, refrigerate them within two hours of cooking. Use airtight containers to prevent moisture loss. I recommend glass or plastic containers with tight lids. These help maintain flavor and texture. For best results, reheat stuffed bell peppers in the oven. Preheat the oven to 350°F (175°C). Place the peppers in an oven-safe dish and cover with foil. Heat for about 15-20 minutes. This method keeps the peppers moist and warm. You can also use a microwave for quick reheating. Heat on medium power for 2-3 minutes. Freezing stuffed bell peppers is easy. Wrap each pepper tightly in plastic wrap, then place them in a freezer bag. They can last up to three months in the freezer. To thaw, place the peppers in the fridge overnight. If you’re in a hurry, use the microwave on defrost mode. After thawing, reheat in the oven for the best taste. You can use beans, lentils, or tofu instead of meat. These ingredients add protein and flavor. Quinoa is also a great choice. It is light and fills you up. Mix in some veggies like spinach or mushrooms for extra taste. Use spices like cumin and chili powder to keep it tasty. You will enjoy a satisfying meal without meat. Yes, you can prepare stuffed bell peppers in advance. Just stuff them and keep them in the fridge. It is best to bake them the same day for the best taste. If you want to bake them later, cover them well. You can also freeze them for longer storage. When ready, thaw and bake until they are hot. You can get creative with the stuffing. Try using rice, farro, or barley instead of quinoa. Add chopped vegetables like zucchini, carrots, or bell peppers. You can also mix in nuts or seeds for crunch. For a different twist, add some cooked pasta. The options are endless, so have fun experimenting! Cooked stuffed peppers last about 3 to 5 days in the fridge. Make sure to store them in an airtight container. Their flavor will change over time. For the best taste, eat them within three days. If you want to keep them longer, consider freezing them. Yes, grilling stuffed bell peppers is a fun way to cook them. Start by preheating your grill. Cut the peppers in half and remove the seeds. Fill them with your stuffing and wrap them in foil to keep them from drying out. Grill for about 15 to 20 minutes. You will enjoy a smoky flavor and a nice char on the peppers. Stuffed bell peppers are a fun and easy dish that anyone can make. We covered the ingredients, prep time, and cooking steps to help you create a tasty meal. Don't forget the tips for variations and storing leftovers! With different fillings, you can customize your peppers to fit any diet. Enjoy experimenting with flavors and ingredient swaps. You'll impress your friends and family with this simple yet delicious recipe. Create a dish you love and make mealtime special!

Stuffed Bell Peppers Flavorful and Easy Recipe

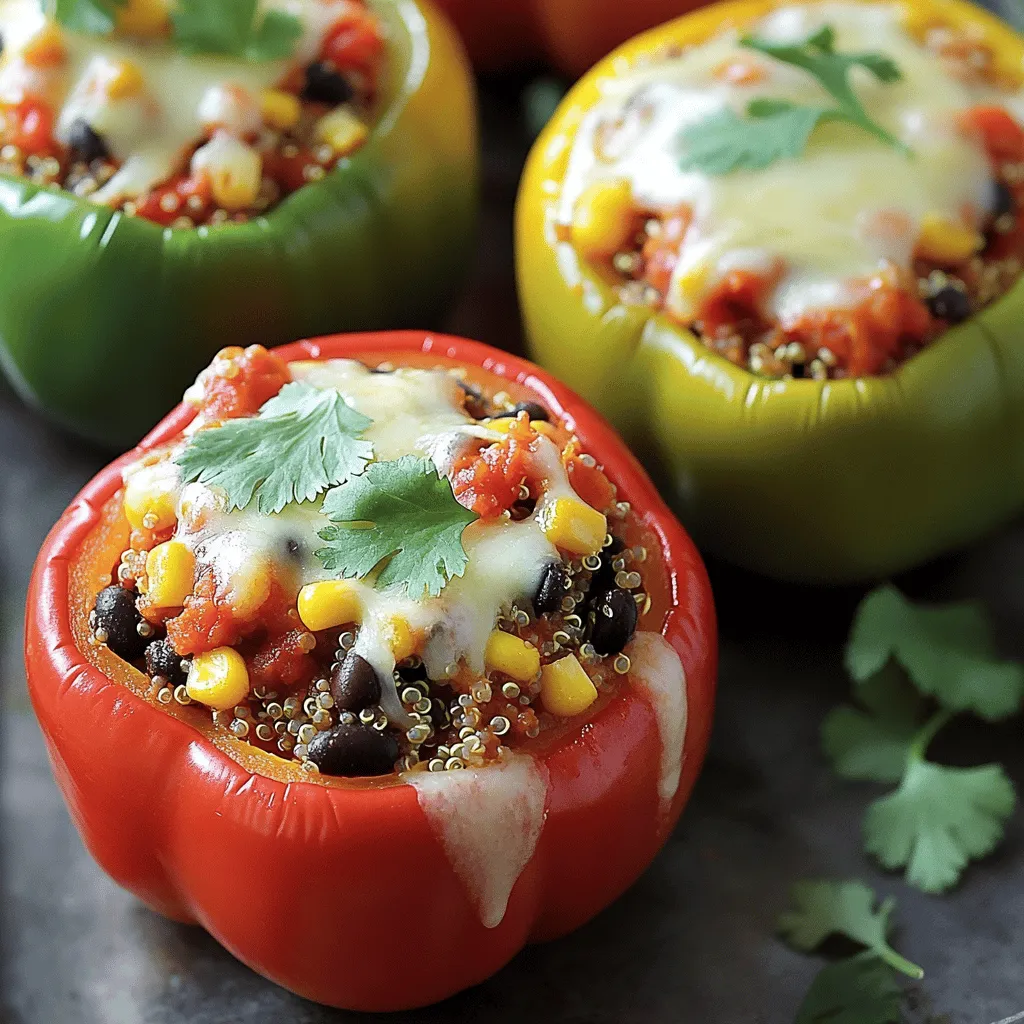
Are you ready to spice up your meal plan? This Stuffed Bell Peppers recipe is not only flavorful but also

Older posts
Page1 Page2 … Page6 Next →

dsad

© 2025 mealmaple • Built with GeneratePress

Our Policies

  • Copyright Policy
  • Cookie Policy
  • GDPR Policy
  • Privacy Policy
  • Disclaimer
  • Terms Of Use

More Information

  • Home
  • About
  • Contact
  • Appetizers
  • Dessert
  • Dinner
  • Drinks
©2025, mealmaple About Back To Top